
EDIBLES
Entertain in style

(Family Features) It’s never too early to plan ahead, especially when you are expecting guests in your home. Your family and friends know and might love your style, but it can be important to spice things up now and again to impress your visitors. Factors such as lights, music and food can affect your guests experience in your home.
To remain stylish and keep your party going, consider these tips for fun and festive home entertaining.
Back to Basics.
Staying organized is key while entertaining guests in your home. Try to plan out every detail before the big event, which can allow things to go more smoothly on the big day. As you think out your plan ahead of time, making lists can be a helpful way to stay organized and ensure you get everything done. List out your guests, what needs to be picked up from the store and possible decorations you might need to buy or craft yourself. The possibilities can seem endless, but it’s important to have a plan in place before you start putting things together.
Think about Theme.
There are numerous ways your style can be shown while entertaining. One way is to pick a theme or theme-related food dishes. One way to show your theme is through decorations. Placing them throughout your home can give the party some life and help guests get into the overall theme of the party.
Light up the Party.
Transforming your home can be made simpler by changing the lighting. It’s typical for lights to be dimmed for parties to set a more relaxed mood. Other ideas include using candles, lamps or even hanging lanterns if you are entertaining outside. Make sure it’s bright enough so everyone can see, but dimmed enough to set the mood for the evening’s events.
Set the Mood with Music.
Pick music that matches your theme and inspires that same feel throughout the house. If you’re going for a fun, energetic atmosphere, try something with a quick tempo, such as pop. If you’re wanting to relax, go for subtler, soothing tones. Try making your playlist before you entertain and listen to it a few times through, that way you can know what to expect and how guests will react to your music selections.
Enjoy it.
Through all the anxiety and stress of entertainment planning, make sure you take time to enjoy yourself during the time guests are in your home. Some guests will notice if you’re not having a good time. Smile and remember to be present in the moment.
Find more entertainment tips at eLivingToday.com.
Photo courtesy of Getty Images
SOURCE:
eLivingToday.com

(Family Features) Eating a balanced diet with fruits, vegetables, whole grains, dairy and proteins is a crucial first step toward a healthy life.
Even with hectic schedules and convenience foods readily available, it’s important to incorporate habits like regular family meals and meal planning so you have a variety of better-for-you snacks and recipes on hand. Also important is leading by example and modeling healthy eating habits to help improve overall nutrition for you and your family members, especially children.
If you are looking for ways to make nutrition fun, the experts at Healthy Family Project, along with its fruit and vegetable partners, are offering an online nutrition resource center as part of Mission for Nutrition 2024.
Geared toward dietitians, nutrition professionals and anyone involved in nutrition education, the resource center is a one-stop shop to make nutrition education fun and inspiring, featuring more than 600 dietitian-approved recipes; tips to pick, prepare and store more than 50 fruits and vegetables during every season; a podcast, e-cookbook and monthly newsletter; and free downloadables, infographics, activities for kids and more.
Dietitians and nutrition professionals can sign up to receive this year’s Mission for Nutrition kit, which is full of resources to use in classrooms, in-store with customers or wherever they’re supporting nutrition education. Available by request only, the kit includes a roll of “I’m a Healthy Eater” stickers, seasonal counter cards, mini magazines, demo ideas, a Healthy Family Project spatula and additional resources and information from produce partners.
As part of the mission, the partner brands are making a donation to improve access to fresh produce in schools through the Foundation for Fresh Produce.
To find more resources, tips and recipes to encourage proper nutrition, visit HealthyFamilyProject.com.
Photo courtesy of Shutterstock
SOURCE:
Healthy Family Project
Kid-friendly crafts that bring loved ones together
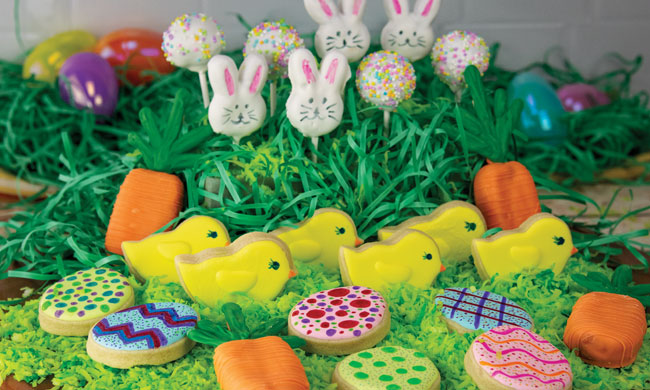
(Family Features) Holiday hams and deviled eggs may take center stage at Easter gatherings, but edible crafts offer a reminder of the magic of the season that’s found in moments spent together. Simple recipes that call for a dose of creativity are perfect ways to bring the kids to the kitchen, made even easier when all that work leads to sweet treats.
While plastic eggs may have led to a decline in good, old-fashioned egg-dyeing, there are still fun ways to bring crafts back to Easter celebrations. Consider these Kids Krafty Easter Cake Pops, which call for little ones to help dip seasonal shapes in chocolate, use cake molds and more.
Children of virtually any age can relish in the joys of using cookie cutters and decorating Easter Sugar Cookies, all with a little supervision and short list of instructions. This version shows how to make the cookies and homemade icing so you can create any color you desire for maximum creativity.
Remember, these delicious crafts don’t have to be perfect – having fun and making memories that last a lifetime are what make Easter truly special.
Visit Culinary.net to find more Easter inspiration and recipes from “Cookin’ Savvy.”
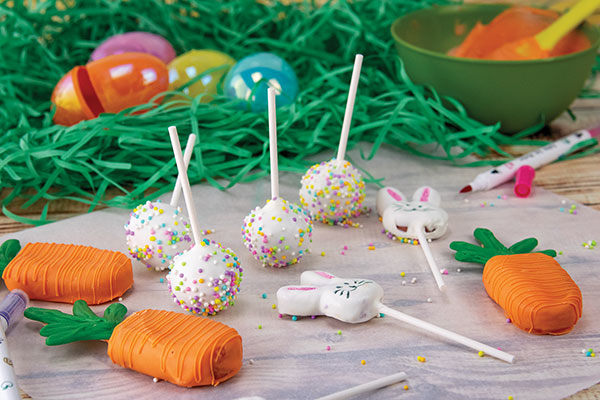
Kids Krafty Easter Cake Pops
Recipe courtesy of “Cookin’ Savvy”
- 1 box cake mix
- 1 can frosting
- 1 bunny chocolate mold
- 1 cakesicle mold
- ice pop sticks
- 1 bag white chocolate chips or melting chips
- cake pop sticks
- 1 bag orange melting chips
- 2 tablespoons canola or coconut oil, divided
- 1 bag green melting chips
- pastel sprinkles
- 1 piece hard foam (optional)
- edible markers
- Bake cake according to package instructions and let cool completely.
- Crumble cake and mix with 1/2 can frosting until dough forms. Add more frosting, if needed. Using small cookie scoop, form dough into balls and set aside. Place dough in bunny molds then pop out and set aside with balls. Place dough in cakesicle mold, insert ice pop stick in each slot and freeze 5-10 minutes.
- Melt handful of white melting chips. Stick tip of each cake pop stick in chocolate then insert into every cake ball and bunny until each has one stick. Set aside to dry.
- Remove cakesicles from freezer and pop out of molds. In bowl, melt orange melts then mix in 1 tablespoon oil and transfer to cup. Dip cakesicles and scrape off excess using rim of cup. Place on parchment paper to dry.
- In bowl, melt green melts then place in zip-top or piping bag. Cut tip off bag, pipe carrot leaves onto piece of parchment paper and let dry.
- Melt remaining white melts and mix in remaining oil. Transfer to cup and dip ball-shaped cake pops and bunnies then tap stick on edge of cup to remove excess.
- Over separate bowl, sprinkle ball-shaped pops with pastel sprinkles. To keep ball shape, let dry by sticking in piece of hard foam. Bunnies can dry face side up on parchment paper. After bunnies are dry, use edible markers to make face and color in ears.
- When carrots and leaves are dry, remelt orange melts and place in piping or zip-top bag. Cut off tip and drizzle orange over carrots. Add small line of orange on each ice pop stick and place leaves on each stick. Let dry.
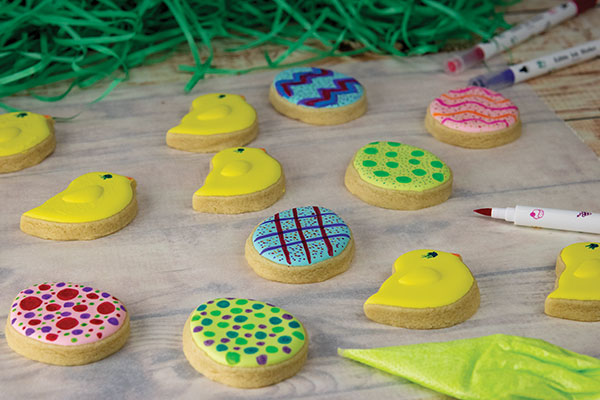
Easter Sugar Cookies
Recipe courtesy of “Cookin’ Savvy”
Icing:
- 1/3 cup meringue powder
- 1/2 cup warm water, plus additional for thinning (optional), divided
- 3 tablespoons vanilla
- 1 bag (2 pounds) powdered sugar
- 2 tablespoons corn syrup
- assorted food coloring
Cookies:
- 2 sticks unsalted butter, at room temperature
- 1 cup sugar
- 1 egg
- 1 tablespoon vanilla
- 2 teaspoons baking powder
- 1 dash salt
- 3 cups all-purpose flour
- To make icing: Mix meringue powder, 1/2 cup warm water, vanilla, powdered sugar and corn syrup. Separate into bowls and add food coloring; mix with water, as needed, to thin for piping.
- To make cookies: Heat oven to 350 F.
- Cream butter and sugar. Mix in egg, vanilla, baking powder and salt. Mix in flour 1 cup at a time to form dough. Roll dough out to 1/4-1/2-inch thickness.
- Cut into shapes, place on baking sheet and freeze 10 minutes. Bake 8-12 minutes. Cool completely before icing.
- Place icing in zip-top or piping bags and cut off tips. Put cookies on parchment paper. Trace outline first then fill in middle. Use toothpicks to smooth out.
- Let dry 6 hours and finish decorating with different icing colors or edible markers.
SOURCE:
Culinary.net
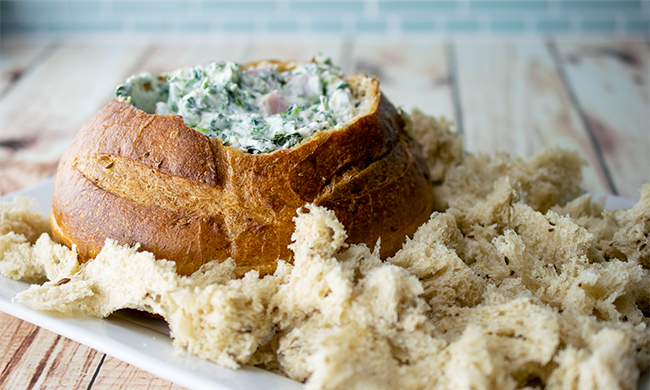
(Culinary.net) Perfect for afternoon snacking or as an appetizer, this Spinach-Ham Dip is warmed inside a bread bowl and can be served with bread cubes, crackers or tortilla chips.
Find more snack ideas at Culinary.net.
Watch video to see how to make this recipe!
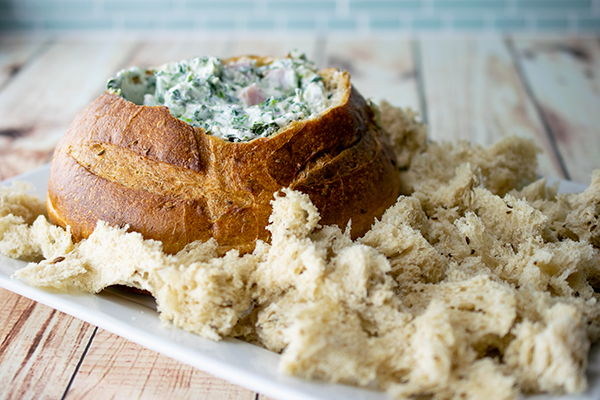
Spinach-Ham Dip
- 2 cups ricotta cheese
- 1 cup sour cream
- 1 package (10 ounces) frozen spinach, thawed and squeezed dry
- 1/4 pound ham, cubed
- 3/4 cup shredded Parmesan cheese
- 2 green onions, thinly sliced
- 1 round bread loaf (16 ounces), unsliced
- Heat oven to 350° F.
- In medium bowl, blend ricotta cheese and sour cream until smooth. Add spinach, ham, Parmesan cheese and green onions; mix until blended.
- Cut 1-2-inch diameter circle out of top of bread loaf. Reserve top. Remove bread inside loaf, leaving about 1 inch along sides. Pour cheese mixture into bread bowl. Replace top. Cover bread loaf in aluminum foil and bake 60 minutes, or until warmed through.
- Take bread removed from inside bread bowl and cut into dipping sized chunks.
- Remove bread from aluminum foil and place on platter. Scatter bread chunks around bread bowl to use for dunking in cheese sauce.
SOURCE:
Culinary.net


-
 NEWS1 year ago
2 hurt, 1 jailed after shooting incident north of Nocona
-

 NEWS5 months ago
Suspect indicted, jailed in Tia Hutson murder
-
 NEWS12 months ago
SO investigating possible murder/suicide
-

 NEWS1 year ago
Wreck takes the life of BHS teen, 16
-
 NEWS9 months ago
Murder unsolved – 1 year later Tia Hutson’s family angry, frustrated with no arrest
-
NEWS12 months ago
Sheriff’s office called out to infant’s death
-
 NEWS1 year ago
Bowie Police face three-hour standoff after possible domestic fight
-
NEWS1 year ago
Driver stopped by a man running into the street, robbed at knifepoint