
EDIBLES
Rocky Road cookies
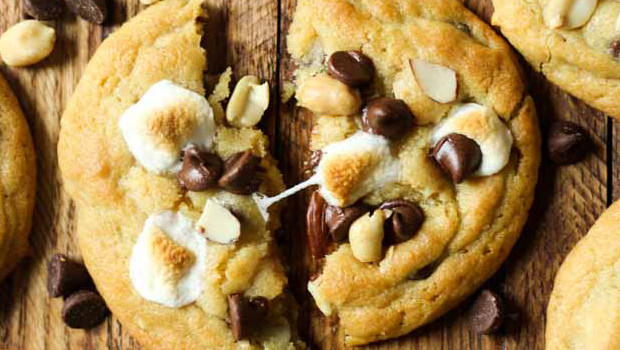
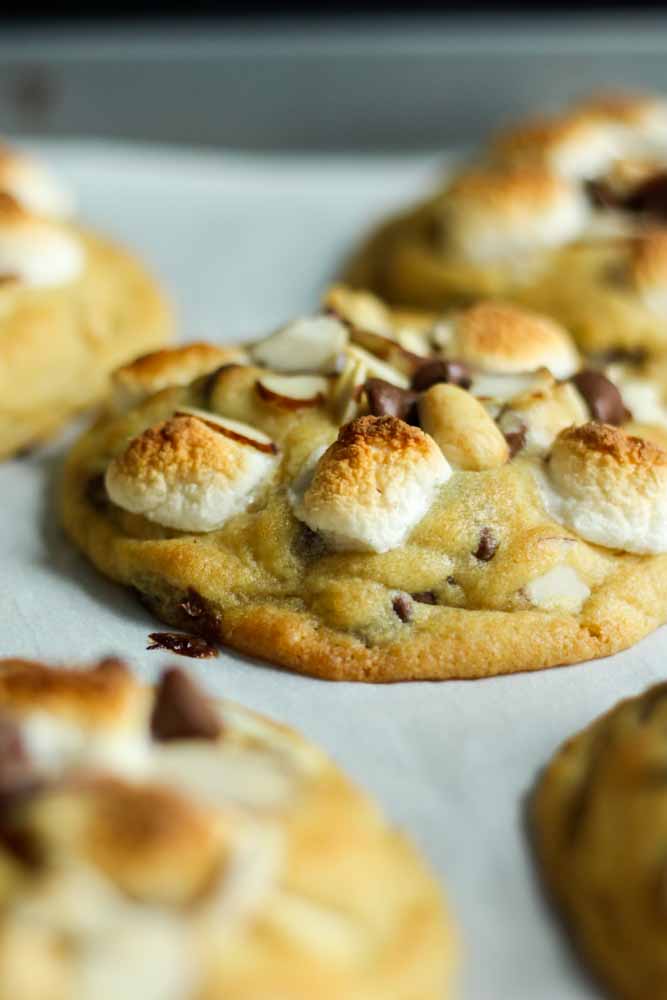
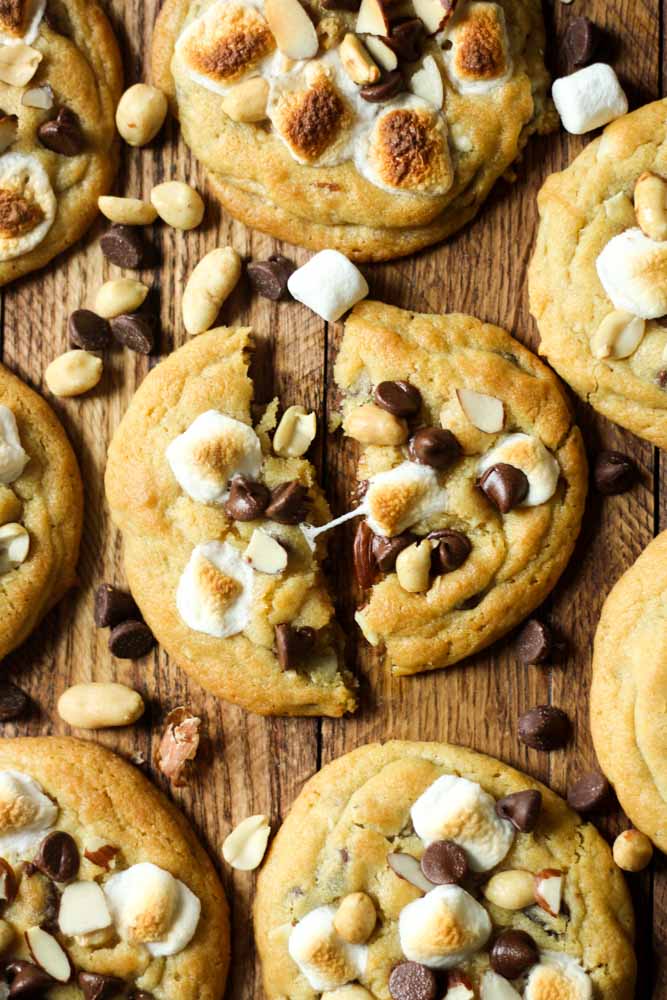
Our famous chocolate chip pudding cookies turned summer classic: Rocky Road Cookies! These warm and gooey cookies are filled with nuts and chocolate chips and topped with a perfectly toasted marshmallow, just what you need this summer!
Hey ya’ll, Molly and Chelsea here! We’re the besties and food bloggers from Bests and Bites. We’ve been best friends for over 20 years (so like, 90% of our lives) and we love nothing more than food, health/fitness and pool days! We’re so glad we could share this recipe with you and hope you love making it this summer!
Guys! There is nothing we love more than a warm and gooey chocolate chip cookie! We’ve (literally) spend years perfecting this recipe and today we put a twist on it to celebrate one of our favorite summer flavors: rocky road!
When we were young babes Molly’s dad would go to the grocery store and stock up on Rocky Road. After a long hard day of swimming( seriously, we used to spend around 9 hours at the pool a day), we would take our showers and sit down on the couch with a big bowl of Rocky Road to finish the night.
It was a dream.
So this summer we wanted to re-create one of our favorite summer traditions by adding it to a classic. AND IT WAS AWESOME. One of the best creations that’s come out of the Bests and Bites kitchen. They are that good.
There are a couple of tricks to making these just right!
Like any baked good, you have to be precise in your measuring or the end result won’t be perfect. That means:
- Measure the flour just right by spooning the flour from the bag into the measuring cup and scraping the top
- Make sure you’ve got room temperature butter for the best consistency
- Do not overbake!
- Toast the marshmallows to perfection
That last one is key, trust us. There were a couple (a dozen) cookies that got a littleeee too toasty. We ended up squatting by the oven when it’s on broil to physically watch the marshmallows and pull them out at the exact right time.
For us it was about 35 seconds to golden brown perfection.
If you follow these tips you will end up with the most chewy and soft rocky road cookies that everyone will love to eat this summer!
- 2¼ cups all purpose flour
- 1 teaspoon baking soda
- ½ teaspoon salt
- 1 cup (2 sticks) unsalted butter, softened
- ¾ cup brown sugar
- ¼ cup granulated sugar
- 3.4 ounces vanilla instant pudding mix
- 2 large eggs
- 1 teaspoon vanilla extract
- 1 cup semi-sweet chocolate chips
- ½ cup chopped almonds, plus extra for topping
- ½ cup chopped walnuts, plus extra for topping
- ½ cup mini marshmallows
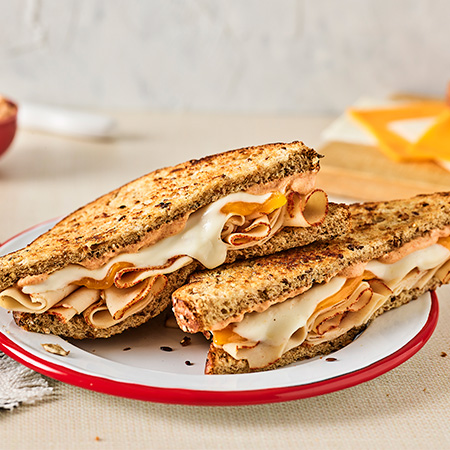
(Feature Impact) A grilled cheese sandwich isn’t just a lunchtime staple; it’s a beloved cultural icon. There is a universal magic in the combination of ooey-gooey cheese, golden bread and a little butter – but in 2026, this comfort food classic is getting a functional upgrade.
It’s also safe to say nostalgia is delicious and addicting, which is why Borden Cheese is sharing not one, but two, prize-worthy recipes, one of which packs a protein punch and another that’s a pure classic, perfect for spreading smiles and happy bellies.
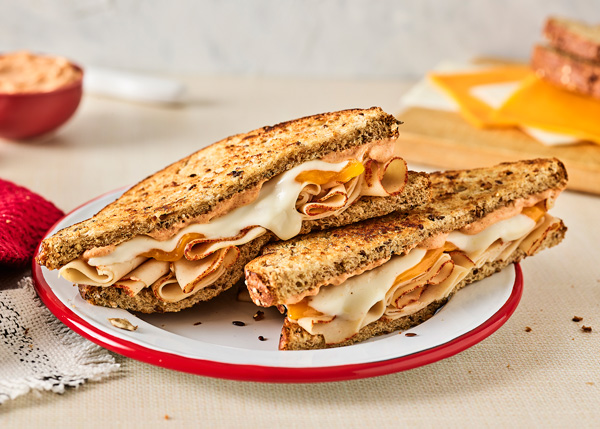
Protein, Please: The Protein Powerhouse is the Grilled Cheese of the Year, and it’s easy to see why. It’s a protein-packed masterpiece designed for the modern appetite. Featuring a creamy, dual-cheese combo of mild cheddar and Borden Mozzarella Cheese Melts, the sandwich is melted over 5 ounces of tender sliced chicken breast and delivers more than 40 grams of protein and about 8 grams of fiber when paired with the right bread. Served with a tangy Greek yogurt and Dijon mustard “powerhouse sauce” and pressed between golden, crispy bread, this grilled cheese isn’t your ordinary melt. It has been transformed into a massive protein boost.
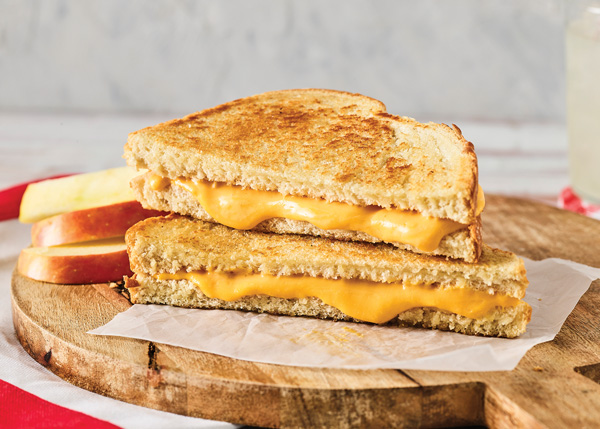
Tried n’ True: While modern flavors and trends are delicious, nostalgia is too. In fact, a whopping 20,000 fans cast their votes for America’s Favorite Grilled Cheese, asserting a fervor that’s unmatched when it comes to their perfect melt, and awarded The Classic the title of “America’s Favorite.” This comforting recipe pairs extra sharp melts with American singles on sliced white bread for a perfect, ooey-gooey bite that reminds you the cheese truly “makes” the sandwich.
VisitBordenCheese.com/grilled-cheese-day for other ooey-gooey grilled cheese recipes created for 2026.
The Protein Powerhouse
- 1 tablespoon butter, softened
- 2 slices bread fortified with protein and fiber
- 2 Borden Mild Cheddar Slices
- 1 slice Borden Mozzarella Melts
- 5 ounces sliced chicken breast (deli-shaved or thinly carved)
“Powerhouse” Sauce:
- 2 tablespoons non-fat Greek yogurt
- 1 teaspoon Dijon mustard
- 1/2 teaspoon garlic powder
- 1/2 teaspoon smoked paprika
- Heat griddle to medium heat. Butter bread. Layer cheeses and chicken on top of bread.
- Place bread on griddle and cook until lightly toasted. Flip and cook other side.
- Remove sandwich from skillet or griddle.
- To make powerhouse sauce: Mix Greek yogurt, Dijon mustard, garlic powder and smoked paprika until well blended. Slice sandwich in half and drizzle with Powerhouse sauce.
The Classic
- 1 tablespoon butter, softened
- 2 slices white bread
- 2 slices Borden Extra Sharp Melts
- 2 slices Borden American Singles
- Heat skillet or griddle over medium heat.
- Spread butter on one side of each slice bread.
- Place cheese slices on unbuttered side of bread. Top with other slice of bread with butter facing upward.
- Place sandwich on skillet or griddle and cook 3-4 minutes on each side. Using spatula, lightly press sandwich down gently while cooking to melt cheese better.
- Remove from skillet or griddle and slice in half.

SOURCE:
Borden
(Feature Impact) Most Americans are eating enough protein. They’re just eating it wrong.
Protein is the macronutrient of the moment – for muscle building, losing weight and staying strong – but nutrition researchers say two things are missing from the conversation: timing and quality.
Spreading protein intake across the day produced about 25% greater muscle protein synthesis, even when the total daily intake was identical, according to research published in the “Journal of Nutrition.”
“Your muscles don’t have a bank account,” said Chris Mohr, PhD, RD, performance nutritionist. “You can’t deposit all your protein at one meal and expect your body to save it for later.”
Most researchers point to a target of about 30 grams of high-quality protein per meal to maximize muscle protein synthesis in most adults.
However, grams aren’t everything. The source matters just as much.
“Aim to get most of your protein from whole, nutrient-dense foods rather than relying on powders, bars and snacks that don’t have much else to offer,” Mohr said. “Supplements have their place but they should build on a real-food foundation, not replace it.”
Quality comes down to amino acids – specifically, whether a source contains all nine essential ones the body can’t produce on its own. Animal proteins (dairy, eggs, meat, fish) check that box. Many plant proteins don’t and tend to be lower in leucine, the amino acid most critical for triggering muscle growth. Dairy is especially rich in leucine.
Mohr recommends a source of dairy at every meal, including milk, Greek yogurt or cottage cheese. He suggests cottage cheese with the highest levels of protein, such as MULU cottage cheese that contains 18 grams of protein per serving – one-third more than the leading brand.
Additionally, Mohr offers these tips to spread protein intake throughout the day:
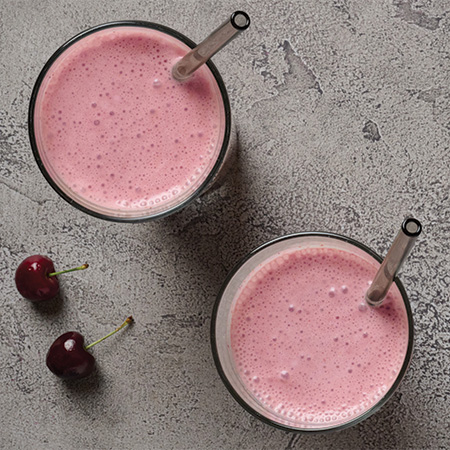
- Start with a protein anchor. Build your morning meal around protein, such as scrambled eggs with cottage cheese or a Tart Cherry Cottage Cheese Smoothie with nut butter.
- Layer in protein at lunch. A salad with grilled chicken, a turkey and cheese wrap or a grain bowl with edamame and hard-boiled eggs can hit the 30-gram target.
- Make snacks count. Use cottage cheeseas a base for dips or keep hard-boiled eggs on hand for quick, protein-rich options. Or, in just 7 minutes when time is of the essence, you can prepare Air Fryer Cottage Cheese Toast with a delicious drizzle of hot honey.
- Treat dinner as a cap, not a catchup. By evening, protein intake should already be well distributed. Try a moderate portion of fish, lean meat or legumes alongside vegetables.
- Eat slow-digesting protein before bed. Studies show consuming casein protein before sleep – the slow-digesting protein found naturally in dairy – supports overnight muscle repair. One-half cup of cottage cheese or a glass of milk before bed is a practical, evidence-backed way to put science to work.
To find more protein-rich solutions to power your day, visit MULUProtein.com.
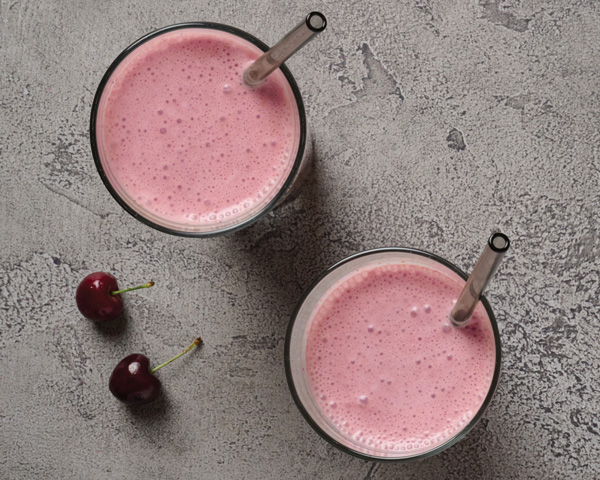
Tart Cherry Cottage Cheese Smoothie
Servings: 2
- 1 cup MULU low-fat cottage cheese
- 1 frozen banana, peeled
- 3/4 cup frozen tart cherries
- 1 tablespoon ground flaxseed
- 1 cup low-fat milk
- 1 tablespoon nut butter
- water
- In blender, blend cottage cheese, banana, cherries, ground flaxseed, milk and nut butter on high speed until completely smooth, 45-60 seconds.
- If smoothie is too thick, add water, 2 tablespoons at a time, and blend to preferred texture.
- Pour into two glasses and serve or pour into sealed jar or container and refrigerate overnight; stir or shake well before drinking.
Nutritional information per serving: 310 calories; 35 g carbohydrates; 22 g protein; 10 g fat.
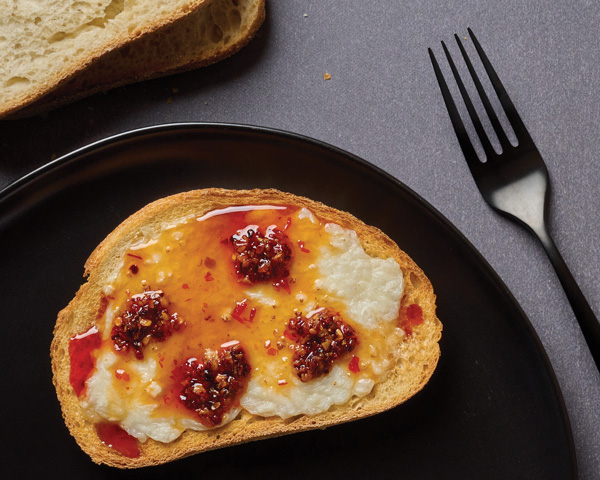
Air Fryer Cottage Cheese Toast
Servings: 2
- 1 cup MULU low-fat cottage cheese
- 2 slices sourdough bread
- 2 teaspoons hot honey
- 2 teaspoons chili crunch
- Preheat air fryer to 400 F.
- Spread 1/2 cup cottage cheese onto each slice of sourdough bread.
- Transfer slices into fryer basket. Cook about 7 minutes, or until cottage cheese is golden, bubbly and lightly set.
- Remove toast from air fryer. Drizzle 1 teaspoon hot honey and 1 teaspoon chili crunch over each slice and serve.
Nutritional information per serving: 295 calories; 38 g carbohydrates; 19 g protein; 6 g fat.
SOURCE:
MULU Cottage Cheese
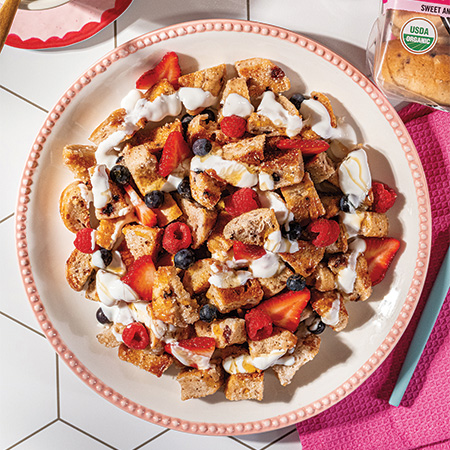
Power Summer Adventures with a Spectacular Bagel Brunch Spread(Feature Impact) Enjoying meals al fresco this summer starts with one simple trick: Head outside before the sun reaches its peak to beat the heat. A summer brunch offers a special way to fuel up before all the adventures and activities a bright, sunny day may bring.
For a light, refreshing bite, Summer Berry Panzanella Salad combines bagel “croutons” and a bushel of berries for a nutritious dose of deliciousness. Or for a hearty solution that’s sure to get you in gear for a day at the park or in the water, this Berry Bagel French Toast Casserole is loaded with favorites like strawberries, blueberries, raspberries and a homemade crumble topping that’s a true crowd-pleaser.
These brunch favorites are powered by limited-edition Dave’s Killer Bread Summer Berry Bagels, which deliver sweet, summery organic goodness with raspberry, blueberry, cranberry and strawberry. Every bite can delight your taste buds, and with 10 grams of protein and 3 grams of fiber in each serving, your body will thank you, too. Available nationwide through July, now’s the time to enjoy them before summer passes by.
To find more summer brunch inspiration, visit DavesKillerBread.com.

Summer Berry Panzanella Salad
Prep time: 25 minutes
Servings: 4-6
Bagel “Croutons:”
- 3 Dave’s Killer Bread Summer Berry Bagels
- 3 tablespoons unsalted butter
- 2 tablespoons brown sugar
- 1 pinch salt
Berry Salad:
- 1 pint strawberries, hulled and sliced (reserve 1/2 cup for dressing)
- 1/2 cup blueberries
- 1/2 cup raspberries (optional)
- 1/2 teaspoon lemon zest
- 1 tablespoon lemon juice
Berry Dressing:
- 1/2 cup strawberries
- 1 tablespoon brown sugar
- 1 pinch salt
Serving:
- 3/4 cup plain Greek yogurt or vanilla yogurt
- 1 tablespoon poppy seeds
- fresh mint (optional)
- Heat oven to 350 F.
- To make bagel croutons: Cut bagels into 3/4-inch cubes. In bowl, melt butter; stir in brown sugar and salt. Toss bagel cubes in butter mixture.
- Spread on baking sheet and bake 15-18 minutes, flipping once, until golden and crisp. Let cool.
- To make berry salad: In large bowl, combine sliced strawberries; blueberries; raspberries, if desired; lemon zest; and lemon juice. Toss gently.
- To make berry dressing: Place reserved strawberries in bowl. Add brown sugar and salt. Using fork or potato masher, mash until juicy and chunky.
- To assemble panzanella salad: Add cooled bagel cubes to berry salad. Pour in mashed strawberry dressing. Toss slightly so bread absorbs juice.
- Let sit 5-10 minutes so bagel pieces soften while staying textured.
- Serve in bowls with yogurt, poppy seeds and mint leaves, if desired.

Berry Bagel French Toast Casserole
Prep time: 55 minutes
Servings: 6-8
Casserole Base:
- 5 Dave’s Killer Bread Summer Berry Bagels
- 1 cup strawberries, sliced, divided
- 3/4 cup blueberries, divided
- 1/2 cup raspberries, divided
- 8 large eggs
- 1 1/2 cups milk
- 1/2 cup heavy cream
- 2 tablespoons maple syrup
- 2 tablespoons brown sugar
- 1 teaspoon vanilla extract
- 1 teaspoon cinnamon
- 1/4 teaspoon salt
Crumble Topping:
- 1/4 cup flour
- 1/4 cup brown sugar
- 1/4 teaspoon cinnamon
- 1 pinch salt
- 4 tablespoons melted butter
Serving:
- powdered sugar
- maple syrup
- berries (optional)
- To make casserole base: Preheat oven to 300 F. Cut bagels into 1-inch cubes. Spread on baking sheet and toast 10 minutes until slightly dry.
- Lightly grease 9-by-13-inch baking dish. Add toasted bagel cubes and half the berries.
- Whisk eggs, milk, cream, maple syrup, brown sugar, vanilla, cinnamon and salt. Pour evenly over bagels.
- Press bread gently so it absorbs custard. Cover and refrigerate 2 hours, or overnight.
- Heat oven to 350 F.
- To make crumble topping: Mix flour, brown sugar, cinnamon, salt and melted butter. Sprinkle mixture over casserole. Add remaining berries.
- Bake 40-45 minutes until center is set and top is light golden color. If it browns too quickly, tent loosely with foil.
- Let rest 5-10 minutes. Dust with powdered sugar and serve with maple syrup. Top with extra berries, if desired.
SOURCE:


-

 NEWS3 years ago
Suspect indicted, jailed in Tia Hutson murder
-
 NEWS4 years ago
2 hurt, 1 jailed after shooting incident north of Nocona
-
 NEWS3 years ago
SO investigating possible murder/suicide
-

 NEWS4 years ago
Wreck takes the life of BHS teen, 16
-

 NEWS3 years ago
Murder unsolved – 1 year later Tia Hutson’s family angry, frustrated with no arrest
-
 Show us something good9 years ago
Country music star children perform in Bowie
-
NEWS3 years ago
Sheriff’s office called out to infant’s death
-
 100th Birthday4 years ago
Looking back at the 1958 Centennial edition of The Bowie News