EDIBLES
Get creative with Easter sweets

Kid-friendly crafts that bring loved ones together
(Family Features) Holiday hams and deviled eggs may take center stage at Easter gatherings, but edible crafts offer a reminder of the magic of the season that’s found in moments spent together. Simple recipes that call for a dose of creativity are perfect ways to bring the kids to the kitchen, made even easier when all that work leads to sweet treats.
While plastic eggs may have led to a decline in good, old-fashioned egg-dyeing, there are still fun ways to bring crafts back to Easter celebrations. Consider these Kids Krafty Easter Cake Pops, which call for little ones to help dip seasonal shapes in chocolate, use cake molds and more.
Children of virtually any age can relish in the joys of using cookie cutters and decorating Easter Sugar Cookies, all with a little supervision and short list of instructions. This version shows how to make the cookies and homemade icing so you can create any color you desire for maximum creativity.
Remember, these delicious crafts don’t have to be perfect – having fun and making memories that last a lifetime are what make Easter truly special.
Visit Culinary.net to find more Easter inspiration and recipes from “Cookin’ Savvy.”

Kids Krafty Easter Cake Pops
Recipe courtesy of “Cookin’ Savvy”
- 1 box cake mix
- 1 can frosting
- 1 bunny chocolate mold
- 1 cakesicle mold
- ice pop sticks
- 1 bag white chocolate chips or melting chips
- cake pop sticks
- 1 bag orange melting chips
- 2 tablespoons canola or coconut oil, divided
- 1 bag green melting chips
- pastel sprinkles
- 1 piece hard foam (optional)
- edible markers
- Bake cake according to package instructions and let cool completely.
- Crumble cake and mix with 1/2 can frosting until dough forms. Add more frosting, if needed. Using small cookie scoop, form dough into balls and set aside. Place dough in bunny molds then pop out and set aside with balls. Place dough in cakesicle mold, insert ice pop stick in each slot and freeze 5-10 minutes.
- Melt handful of white melting chips. Stick tip of each cake pop stick in chocolate then insert into every cake ball and bunny until each has one stick. Set aside to dry.
- Remove cakesicles from freezer and pop out of molds. In bowl, melt orange melts then mix in 1 tablespoon oil and transfer to cup. Dip cakesicles and scrape off excess using rim of cup. Place on parchment paper to dry.
- In bowl, melt green melts then place in zip-top or piping bag. Cut tip off bag, pipe carrot leaves onto piece of parchment paper and let dry.
- Melt remaining white melts and mix in remaining oil. Transfer to cup and dip ball-shaped cake pops and bunnies then tap stick on edge of cup to remove excess.
- Over separate bowl, sprinkle ball-shaped pops with pastel sprinkles. To keep ball shape, let dry by sticking in piece of hard foam. Bunnies can dry face side up on parchment paper. After bunnies are dry, use edible markers to make face and color in ears.
- When carrots and leaves are dry, remelt orange melts and place in piping or zip-top bag. Cut off tip and drizzle orange over carrots. Add small line of orange on each ice pop stick and place leaves on each stick. Let dry.

Easter Sugar Cookies
Recipe courtesy of “Cookin’ Savvy”
Icing:
- 1/3 cup meringue powder
- 1/2 cup warm water, plus additional for thinning (optional), divided
- 3 tablespoons vanilla
- 1 bag (2 pounds) powdered sugar
- 2 tablespoons corn syrup
- assorted food coloring
Cookies:
- 2 sticks unsalted butter, at room temperature
- 1 cup sugar
- 1 egg
- 1 tablespoon vanilla
- 2 teaspoons baking powder
- 1 dash salt
- 3 cups all-purpose flour
- To make icing: Mix meringue powder, 1/2 cup warm water, vanilla, powdered sugar and corn syrup. Separate into bowls and add food coloring; mix with water, as needed, to thin for piping.
- To make cookies: Heat oven to 350 F.
- Cream butter and sugar. Mix in egg, vanilla, baking powder and salt. Mix in flour 1 cup at a time to form dough. Roll dough out to 1/4-1/2-inch thickness.
- Cut into shapes, place on baking sheet and freeze 10 minutes. Bake 8-12 minutes. Cool completely before icing.
- Place icing in zip-top or piping bags and cut off tips. Put cookies on parchment paper. Trace outline first then fill in middle. Use toothpicks to smooth out.
- Let dry 6 hours and finish decorating with different icing colors or edible markers.
SOURCE:
Culinary.net
EDIBLES
Quick, delicious breakfasts to start your day with a bang

(Family Features) If you’re looking for a little motivation to take on a busy day or fueling up for an adventurous weekend with the family, there’s no better way to start the morning than with a filling breakfast. However, not everyone takes full advantage of this ever-important opportunity to prepare for the day ahead.
For some, skipping breakfast is due to a lack of time in the morning. For others, it isn’t about a lack of hunger or time; it’s boredom from quick solutions like cereal or a bagel.
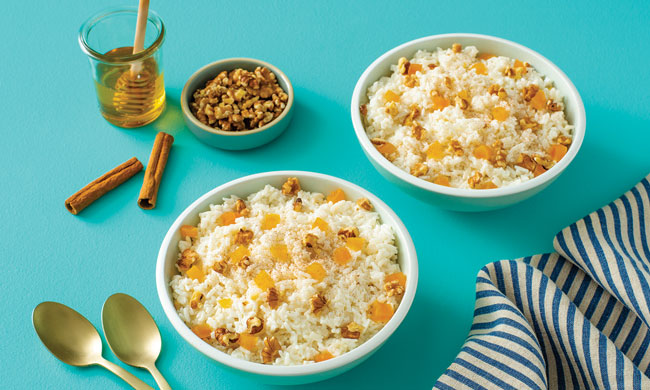
Take your breakfast to a whole new level – without sacrificing too many precious morning minutes – with recipes you can get excited about like Basmati with Apricots, Walnuts, Yogurt and Honey. Jam-packed with flavor, it takes 5 minutes to prepare so you can serve your whole family a nutritious, filling meal even if you’re in a rush.
A long-grain rice that’s common in India, basmati is fragrant with a nutty flavor and fluffy texture that pairs well with the sweetness of dried fruits like raisins, cranberries, apricots and dates for a combination of flavor and nutrition at the breakfast table. Better yet, you can enjoy it during busy mornings with Minute Instant Basmati Rice, which is ready in just 5 minutes on the stove or in the microwave for quick, delicious, aromatic dishes.
When you’re in need of a single-serve meal that’s big on flavor but short on prep time before heading to the office, it’s hard to top a comforting breakfast scramble. This Tomato, Bacon, Onion and Cheddar Scramble is sure to awaken your taste buds while providing the energy you need to take on the day.
Fully cooked Minute Chicken & Herb Seasoned Rice Cups offer homestyle taste with carrots, onion and garlic. Ready in only 1 minute, the delicious combination of chicken, vegetables and herbs with hearty rice serves as a perfect base for savory omelets and scrambles. Plus, the BPA-free cups are a great option for an on-the-go power-up. For an even easier solution, you can eat the flavored rice right out of the cup so the breakroom or kitchen will stay clean while you enjoy a pick-me-up.
Discover more recipes that can fuel your mornings at MinuteRice.com.

Basmati with Apricots, Walnuts, Yogurt and Honey
Prep time: 3 minutes
Cook time: 2 minutes
Servings: 4
- 1 cup Minute Instant Basmati Rice
- 1/3 cup dried apricots, diced
- 1/3 cup walnut pieces
- 1/4 cup plain yogurt
- 1 teaspoon honey
- 1/4 teaspoon ground cinnamon
- 1/3 cup fresh apples, diced (optional)
- Heat rice according to package directions.
- In cereal bowl, mix rice with apricots, walnuts and yogurt. Drizzle with honey and sprinkle with cinnamon. Top with diced apples, if desired, and serve.

Tomato, Bacon, Onion and Cheddar Scramble
Prep time: 5 minutes
Cook time: 5 minutes
Servings: 1
- 1 Minute Chicken & Herb Seasoned Rice Cup
- 1 tablespoon butter
- 1/8 cup diced onion
- 1 egg, lightly beaten
- 2 strips bacon, cooked and crumbled
- 1/4 cup diced tomato
- 1/4 cup shredded cheddar cheese
- sliced scallions or parsley, for garnish (optional)
- Heat rice according to package directions.
- In medium, nonstick saute pan over medium heat, heat butter. Add onion and saute 1 minute.
- Add egg to pan and cook, stirring frequently, until scrambled and cooked through.
- Add rice, bacon and tomato to pan; stir to combine until heated through. Stir in cheese. Garnish with scallions or parsley, if desired, and serve.
SOURCE:
Minute Rice
EDIBLES
Spice up dinnertime in 30 minutes

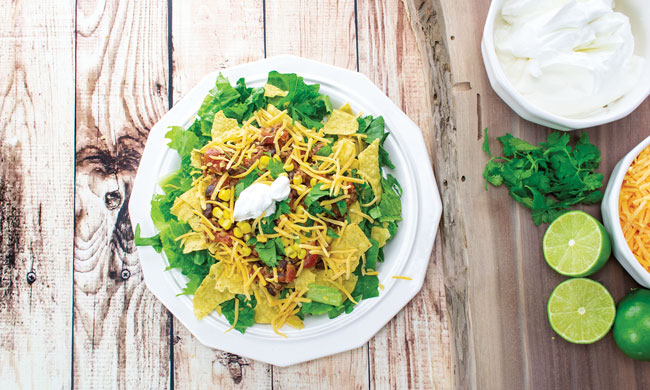
(Family Features) If you’re looking for a go-to meal for your hungry family, search no more. This Taco Salad calls only for pantry staples so you can spice up busy evenings in just half an hour. Visit Culinary.net for more quick dinner solutions.
Taco Salad
Recipe courtesy of “Cookin’ Savvy”
Total time: 30 minutes
Servings: 6
- 1 pound ground beef
- 1 can (15 ounces) black beans
- 1 can (15 ounces) corn
- 2 cans (14 ounces each) diced tomatoes with chilies
- 1/2 cup half-and-half or milk
- 2 tablespoons onion powder
- 2 tablespoons garlic powder
- 2 tablespoons mesquite seasoning
- 1 tablespoon black pepper
- salt, to taste
- 1 lime, juice only
- 1 cup chopped cilantro
- romaine lettuce
- 2-3 cups shredded cheese
- 1 tub (16 ounces) sour cream
- crushed tortilla chips
- In pan over medium heat, brown beef until cooked through; drain. Add black beans and corn. Stir in tomatoes with juices and half-and-half. Add onion powder, garlic powder, mesquite seasoning and pepper. Season with salt, to taste. Bring to simmer.
- Add lime juice; stir. Sprinkle with cilantro.
- Wash and chop lettuce. Place cheese and sour cream in bowls for toppings.
- On plates, top crushed tortilla chips with meat sauce, lettuce, cheese and sour cream, as desired.
SOURCE:
Culinary.net
EDIBLES
Shake up family meals with a versatile superfood

(Family Features) It’s easy to fall into a dinnertime rut, cooking the same meals with the same ingredients time and again. When your family is in search of a delicious way to shake things up in the kitchen, consider new ways to cook favorite dishes without completely rethinking the menu.
Replacing tired ingredients is an easy solution when classic recipes become bland and boring, which is a perfect reason to try cooking with 4th & Heart Ghee. As a 1:1 substitute for butter or oil, its spreadable texture makes it easy to use in baked goods, grilled dishes and beyond.
This superfood can do all the things butter can do – like make toast taste awesome and trick your kids into eating broccoli – but with additional benefits. For example, it maintains its molecular integrity at high temperatures, can be digested by lactose intolerant people, supports weight loss, improves digestion and reduces inflammation.
Consider these benefits of choosing 4th & Heart Ghee instead of butter:
- Grass-fed and pasture-raised: It’s packed with naturally occurring fatty acids and CLA, which can improve gut health and biochemistry.
- Spreadable and shelf-stable: Ghee is shelf-stable for up to 12 months and is best kept in the pantry. This means you never have to scramble to bring butter to room temperature quickly when baking or risk mangling your toast with cold butter.
- High smoke point: When oil smokes, it becomes a trans fatty acid. With a smoke point of 485 F, ghee lets you cook away without worrying about high temperatures.
- Natural source of butyric acid: Butyric acid naturally occurs in your gut and in ghee, helping your body absorb nutrients from the foods you eat.
- Buttery taste: Ghee made in the traditional style provides a delicious, light and buttery taste, perfect for this Sweet Potato Bowl with Cilantro, Turmeric Ghee and Lime. It’s ideal for a light lunch or dinner as it’s bursting with vibrant flavors and wholesome ingredients.
To find more benefits of cooking with ghee, along with recipe inspiration, visit fourthandheart.com.

Sweet Potato Bowl with Cilantro, Turmeric Ghee and Lime
- 2 large sweet potatoes, peeled and cubed
- 2 tablespoons 4th & Heart Turmeric Ghee, divided
- 1 teaspoon cumin powder
- 1 teaspoon smoked paprika
- salt, to taste
- pepper, to taste
- 1 cup quinoa
- 1 can black beans, drained and rinsed
- 1/4 cup red onion, finely diced
- 1/4 cup fresh cilantro, chopped, plus additional for garnish, divided
- 1 lime, juice only
- 1/4 cup crumbled feta or goat cheese (optional)
- Preheat oven to 400 F.
- In large bowl, toss cubed sweet potatoes with 1 tablespoon turmeric ghee, cumin powder and smoked paprika; add salt and pepper, to taste. Spread sweet potatoes evenly on baking sheet and roast 25-30 minutes, or until tender and slightly crispy on edges, turning halfway through.
- Cook quinoa according to package instructions. Once cooked, fluff with fork and set aside.
- In medium bowl, mix cooked quinoa with black beans, red onion and 1/4 cup chopped cilantro.
- Drizzle half the lime juice over quinoa mixture and stir to combine. Add salt and pepper, to taste.
- In large serving bowl, top quinoa mixture with roasted sweet potatoes. Drizzle remaining turmeric ghee over bowl. Squeeze remaining lime juice over top. Garnish with additional chopped cilantro and crumbled feta or goat cheese, if desired.
SOURCE:
4th & Heart Ghee
-

 NEWS2 years ago
2 hurt, 1 jailed after shooting incident north of Nocona
-

 NEWS8 months ago
Suspect indicted, jailed in Tia Hutson murder
-

 NEWS1 year ago
SO investigating possible murder/suicide
-

 NEWS2 years ago
Wreck takes the life of BHS teen, 16
-

 NEWS12 months ago
Murder unsolved – 1 year later Tia Hutson’s family angry, frustrated with no arrest
-

 NEWS1 year ago
Sheriff’s office called out to infant’s death
-

 NEWS2 years ago
Bowie Police face three-hour standoff after possible domestic fight
-

 NEWS2 years ago
Driver stopped by a man running into the street, robbed at knifepoint


