
EDIBLES
Red Velvet Oreo cookie truffles for Valentine’s Day

Everyone loved the Holiday Peanut Butter Balls, and the Golden Oreo Truffles with edible glitter are quickly becoming popular. For those two reasons, and because I love deliciously easy treats, I’m bringing you Red Velvet Oreo Truffles! This recipe will give you a dozen yummy balls that are perfect for Valentine’s Day!
Red Velvet Oreo Truffles
You find the ingredients and recipe below, with a printable option if you need it. This quick little video will show you how easy it is to whip up these Red Velvet Oreo Truffles.
have two little secrets for you. First, you can easily switch up the flavor with any of your favorite Oreos. Second, you could also drizzle some melted red chocolate melts on top of the truffles, if you wanted to add more color. ?

Store these Red Velvet Oreo Truffles in an airtight container in the refrigerator up to 3 days, if they last that long! Some of the things used for this recipe are available on Amazon, if you need to grab them:
- Oreo Red Velvet Sandwich Cookies (12.2-Ounce Package)
- Wilton Bright White Candy Melts
- Wilton Sweetheart Valentine Sprinkles Mix
- Wilton Red Candy Melts
- Ingredients
- 20-24 Red Velvet Oreo cookies
- 8 oz brick of cream cheese – softened
- 12 oz bag of Wilton white chocolate melts or white chocolate chips
- Assorted Valentine sprinkles
- Optional- red chocolate melts
Instructions
- 1. Line a large baking pan with wax or parchment paper and set aside.
- 2. Open the brick of cream cheese and place in a large mixing bowl to soften at room temperature for 30 minutes.
- 2. Pulse the red velvet Oreo cookies (the whole cookie) into crumbs in a food processor and add to the cream cheese.
- 3. Mix well with a rubber spatula until well incorporated.
- 4. Cover and chill for 30 minutes for easier handling.
- 5. Roll the Oreo mixture into 1 inch balls and place on the lined baking sheet. Chill for an additional 15 minutes.
- 6. In a double boiler pan, melt the white chocolate melts under low/medium heat. Stir occasionally until melted and smooth. Pour into a shallow bowl for easier dipping.
- 3. Dip an Oreo ball into the melted chocolate and place back on the lined baking sheet. Immediately cover it with sprinkles. The chocolate will harden rather quickly because the Oreo balls have been chilled so be sure to sprinkle right away or you may have to dip the balls again in the chocolate.
- 4. Repeat step 3 until all of the truffles have been coated with chocolate and sprinkled.
- (Optional – you could also drizzle some melted red chocolate melts on top of the truffles, if you wanted to add more color)

(Family Features) Watermelon, strawberries, corn and green beans get all the fresh produce love in the summer, but don’t forget broccoli as a warm-weather staple. Instead of dunking in dressing or smothering with melted cheese, go for a lighter dish with this Broccoli Salad – an ideal light lunch or simple summer side. Visit Culinary.net to find more veggie-inspired salad ideas.

Broccoli Salad
Recipe courtesy of “Cookin’ Savvy”
Servings: 4-6
- 2 medium heads broccoli
- 2 apples
- lemon juice
- 1 carrot
- 1 cup blueberries
- 1 cup dried cranberries
- 1 cup sunflower seeds
- 1 cup pecans
- 1 package (2 1/2 ounces) real bacon pieces
Dressing:
- 1 cup mayonnaise
- 1/3 cup milk
- 1/3 cup apple cider vinegar
- 2/3 cup sugar
- 2 tablespoons poppy seeds
- Coarsely chop broccoli and place in large bowl. Coarsely chop apples and brush with lemon juice to prevent browning; add to bowl. Shred carrot and add to bowl with blueberries, cranberries, sunflower seeds, pecans and bacon.
- To make dressing: Mix mayonnaise, milk, apple cider vinegar, sugar and poppy seeds. Pour over broccoli salad and mix well.
SOURCE:
Culinary.net
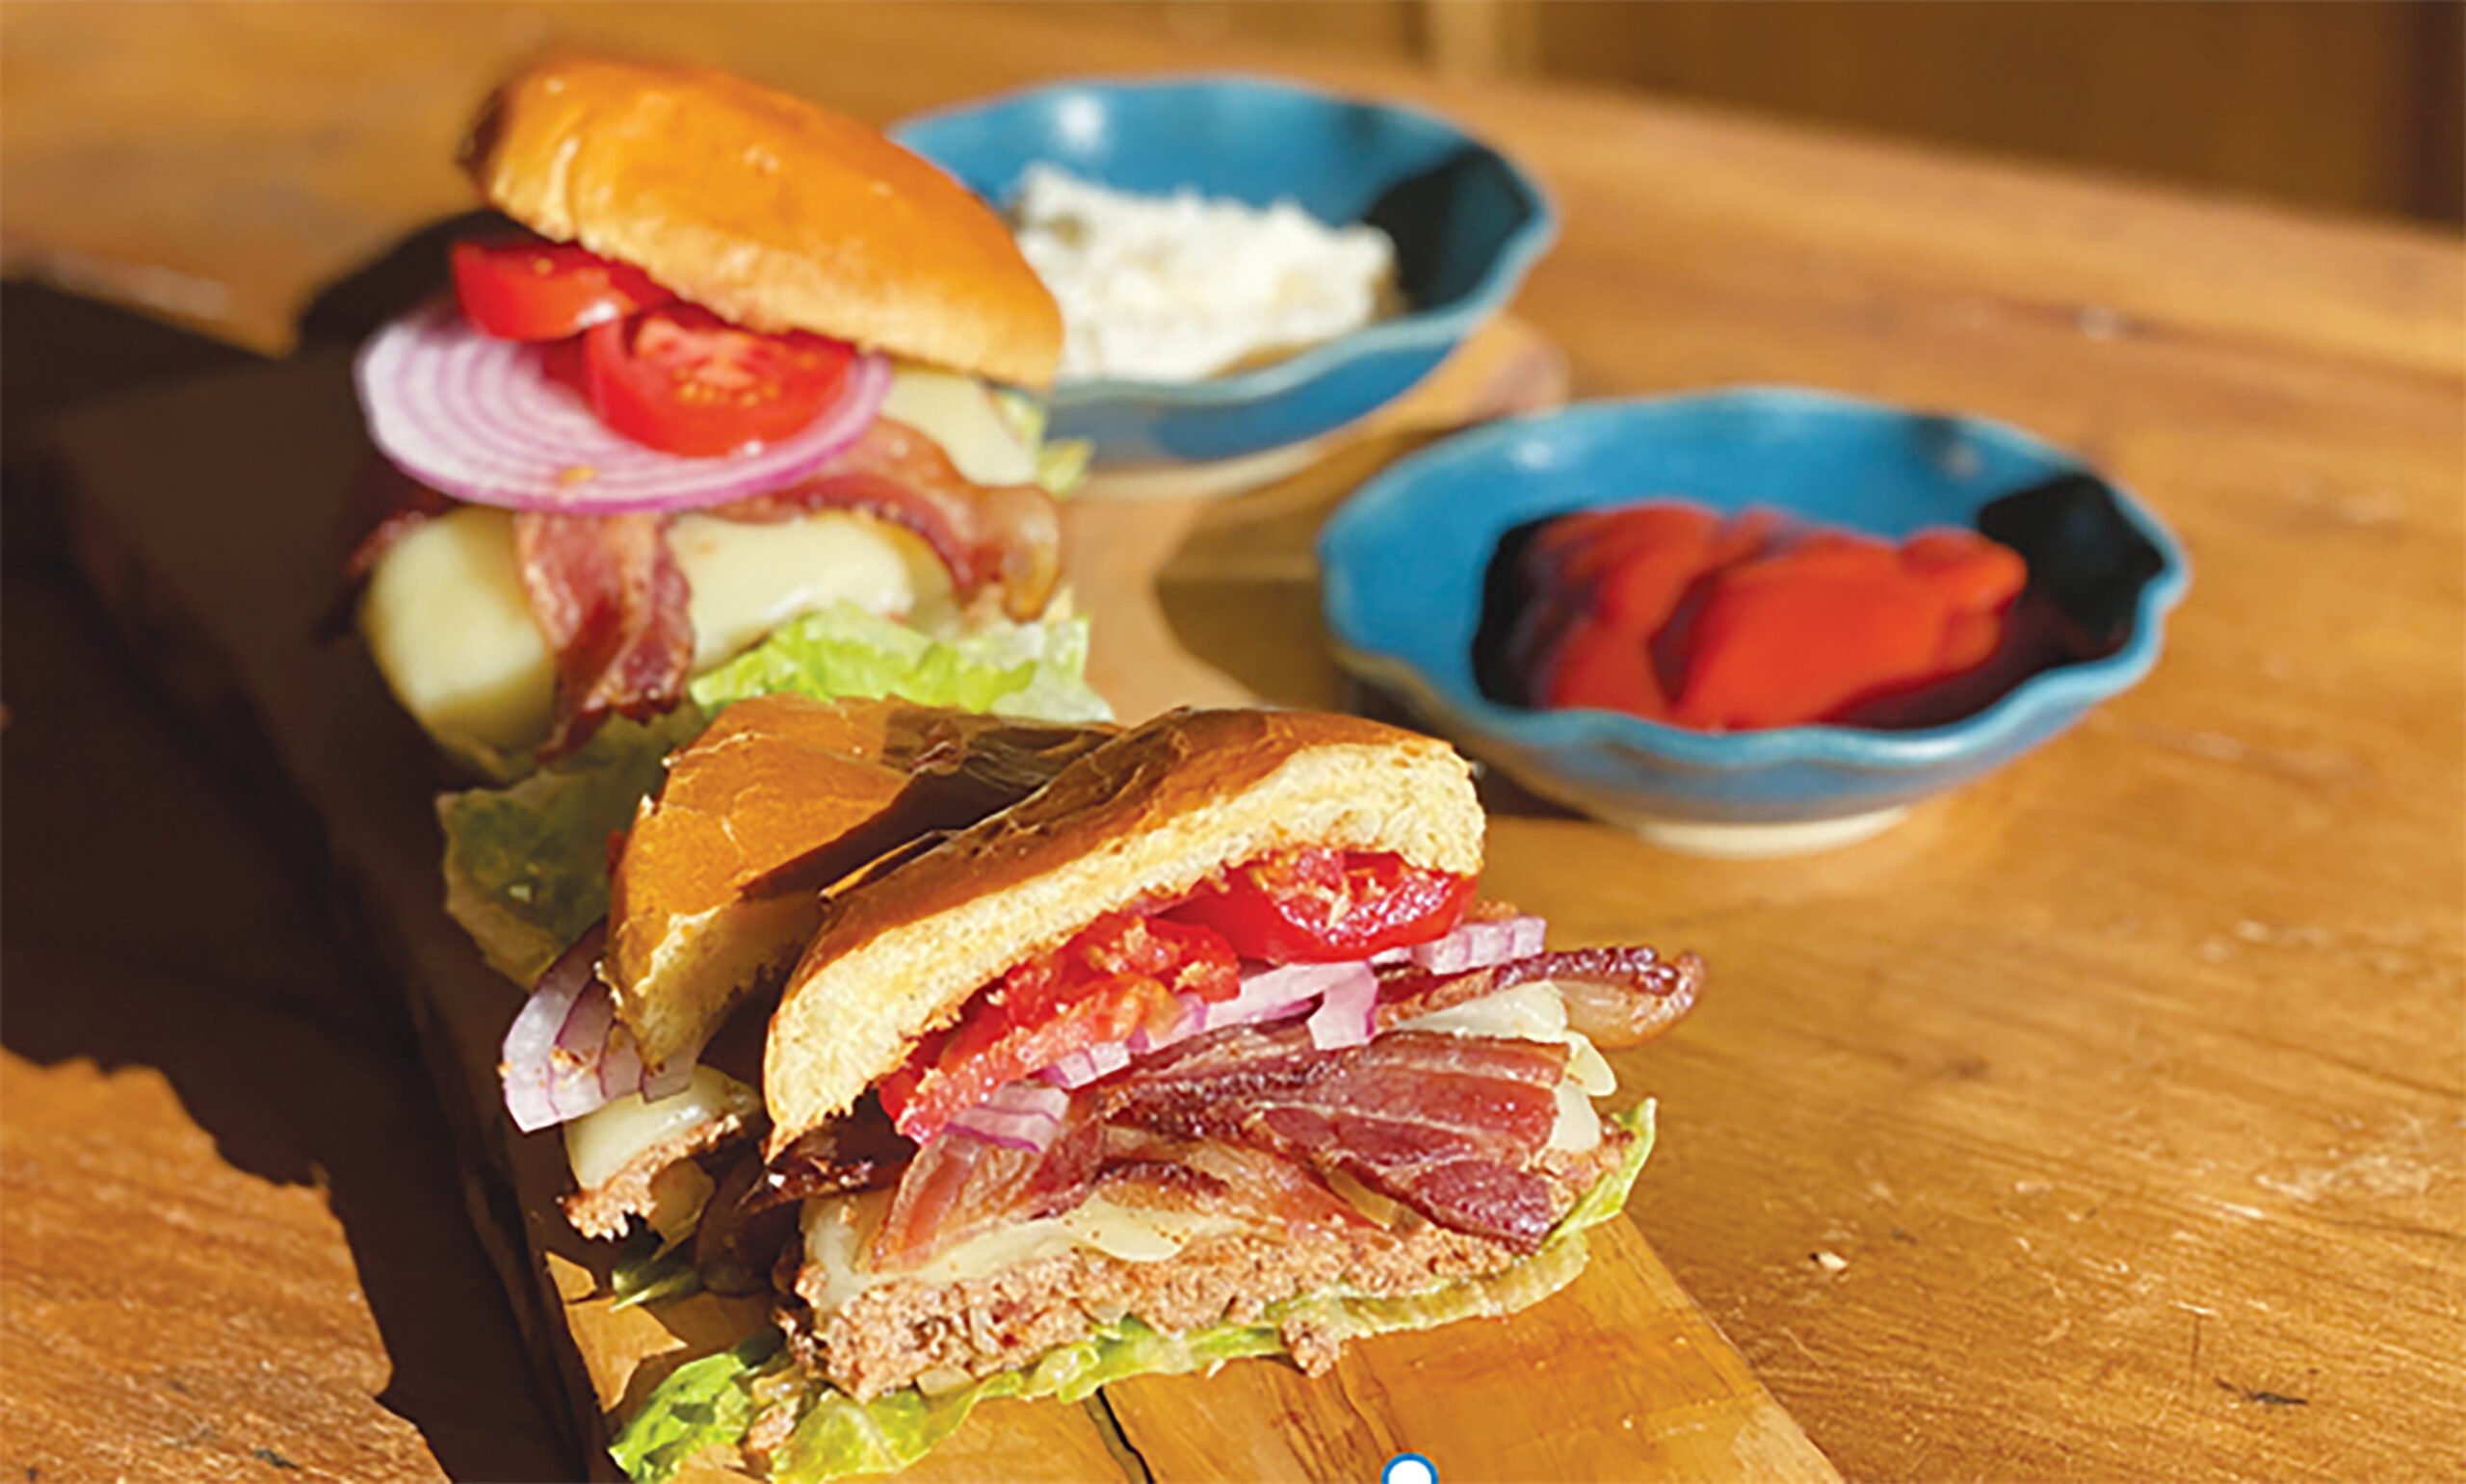
(Family Features) Summer is here and it’s time to hit the grill. Take at-home entertaining to the next level by upgrading everyone’s favorite cheeseburger with ground pork.
Family and friends will love this elevated twist on a summer favorite that is oh-so-deliciously different than the traditional beef patty. These Pork and Bacon Burgers are made with Heritage Duroc pork, known for its rich flavor and juiciness, and will be a hit at your next barbecue. The crispy bacon adds another level of texture and flavor, making these juicy burgers a gourmet treat that rivals any takeout burger. Celebrating 150 years as the premium all-natural meat choice for families, Coleman All Natural Meats offers a variety of products that are sourced from American family farmers who humanely raise livestock with no antibiotics ever and no added hormones.
Find more recipes to elevate your grilling experience at ColemanNatural.com.
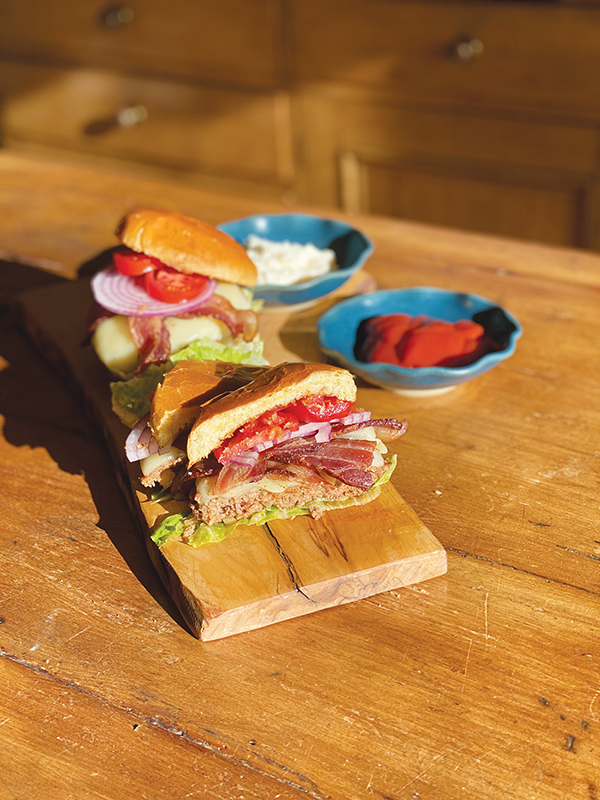
Pork and Bacon Burgers
Prep time: 10 minutes
Cook time: 10 minutes
Servings: 6
- 2 pounds Coleman Ground Pork
- 1/4 pound ground pork chorizo
- 1 medium onion, diced
- 2 cloves garlic, minced
- 1 teaspoon pepper
- 1 teaspoon salt
- 6 cheese slices (optional)
- 6 hamburger buns
- 6-8 strips Coleman Hickory Smoked Uncured Bacon, cooked
- tomato slices (optional)
- red onion slices (optional)
- lettuce (optional)
- ketchup (optional)
- mayonnaise (optional)
- Preheat grill to medium heat.
- In large mixing bowl, combine ground pork, chorizo, onion, garlic, salt and pepper.
- Gently mix ingredients, being careful not to overwork meat.
- Divide meat into six burger patties.
- Cook burgers 3-4 minutes per side until internal temperature reaches 145 F or desired doneness.
- During last 2-3 minutes of cooking, place cheese slices on top of burgers to melt, if desired.
- Transfer burgers to platter. Assemble burgers with buns, bacon, tomato slices, red onion slices, lettuce, ketchup and mayonnaise, as desired.
Tip: Burger patties may be frozen up to 1 month. Fully defrost before cooking.
SOURCE:

(Family Features) It’s easy to get into a recipe rut when every day feels the same – work, kids’ activities, social events and bedtime routines make it tough to experiment in the kitchen. If your family’s meals are growing boring, all you need is a touch of heat to bring new life to the menu.
Add a delicious blend of savory, sweet and a hint of spice to mealtime with Minute Hot Honey Chicken Seasoned Rice Cups, which are ready to serve fast for busy families. Packed with flavor, they complement main courses, snacks and sides without the hassle.
With just the right balance of heat and honey, they add delicious sizzle and mouthwatering flavor to recipes like Hot Honey Chicken Meatball Subs. Perfectly toasted hoagie rolls are packed with spicy, sweet chicken meatballs and smothered in melted provolone for a tough-to-top taste. Ready in 35 minutes, the subs offer a blend of convenience and gourmet flavor, making this meal an unbeatable choice at dinner time.
Sandwiches deliver an easy way to make mealtime customizable so all your loved ones are satisfied. Try topping your subs with coleslaw for a crunchy, creamy texture or pickled vegetables for an added touch of tanginess to complement the sweet, rich meatballs. For fans of spice, turn up the heat with extra hot sauce.
Solve afternoon hunger pangs with these Hot Honey Chicken Rice Crackers and Ranch Dip, loaded with the sweet heat of hot honey chicken and baked to crispy perfection. This inventive snack is uniquely crunchy and flavorful, blending fiery sweetness with savory chicken flavor as a convenient way to shake up snack time.
For the adventurous types, these homemade crackers pair with more than just ranch. Engage your taste buds further with these suggestions:
- Spicy cheese dip: Add a little extra kick with cheese dip that’s spiced up with jalapenos or chili flakes.
- Cucumber dill yogurt: A perfect match for the sweet heat of hot honey chicken with its refreshing, cooling effect.
- Barbecue sauce: Smoky and slightly sweet, it pairs well with the honey in the crackers.
- Garlic aioli: Rich and garlicky, this dip brings a robust flavor contrast to the table.
Discover more ways to shake up mealtimes by visiting MinuteRice.com.

Hot Honey Chicken Meatball Subs
Prep time: 5 minutes
Cook time: 30 minutes
Servings: 4
- 1 Minute Hot Honey Chicken Seasoned Rice Cup
- 1 pound ground chicken
- 1 teaspoon salt
- 1 teaspoon cayenne pepper (optional)
- 1/4 cup breadcrumbs
- 4 hoagie rolls
- 2 tablespoons butter
- 4 slices provolone cheese
- garlic sauce, for garnish
- Preheat oven to 375 F. Heat rice according to package directions.
- In large bowl, mix rice; chicken; salt; cayenne, if desired; and breadcrumbs.
- Use cookie scoop or hand roll chicken mixture into balls. Place on aluminum foil-lined sheet tray, leaving small space between each ball. Bake 25 minutes, flipping meatballs halfway through.
- Slice hoagies in half, lengthwise. Remove some bread from middle to make room for meatballs. Butter inside of each hoagie and place on sheet tray.
- Once meatballs are cooked through, turn broiler on high and place buttered hoagies in oven. Cook 1 minute, or until butter is melted and hoagie has browned.
- Remove hoagies from oven, place 3-4 meatballs inside (depending on size) and cover with slice of cheese. Broil on high 30 seconds to melt cheese.
- Drizzle garlic sauce on top.
Tip: Garlic sauce can be substituted with topping of choice.

Hot Honey Chicken Rice Crackers andRanch Dip
Prep time: 5 minutes
Cook time: 20 minutes
Servings: 2
- 1 Minute Hot Honey Chicken Seasoned Rice Cup
- 1 cup sour cream
- 1/2 packet ranch dip seasoning
- Preheat oven to 400 F. Heat rice according to package directions.
- Lay rice on parchment paper. Place another sheet of parchment paper on top. Use rolling pin to roll out rice into thin layer.
- Bake 20 minutes.
- In medium bowl, mix sour cream and ranch seasoning.
- Once crackers are cooked, cut into squares while still hot. Allow to cool.
- Serve crackers with ranch dip.
Tip: Ranch dip can be substituted with hummus or any flavored dip.
SOURCE:
Minute Rice


-
 NEWS3 years ago
2 hurt, 1 jailed after shooting incident north of Nocona
-

 NEWS2 years ago
Suspect indicted, jailed in Tia Hutson murder
-
 NEWS2 years ago
SO investigating possible murder/suicide
-

 NEWS2 years ago
Wreck takes the life of BHS teen, 16
-

 NEWS2 years ago
Murder unsolved – 1 year later Tia Hutson’s family angry, frustrated with no arrest
-
NEWS2 years ago
Sheriff’s office called out to infant’s death
-
 NEWS2 years ago
Bowie Police face three-hour standoff after possible domestic fight
-
NEWS3 years ago
Driver stopped by a man running into the street, robbed at knifepoint