
EDIBLES
A creative twist on Halloween carvings

(Family Features) When it comes to Halloween, carving the same pumpkin designs each year can become routine. This year, save a pumpkin and carve your spooky masterpiece into a watermelon instead.
Nutrient-rich watermelon can be a healthy alternative to other sweet treats full of added sugar during Halloween festivities as it’s a source of vitamins A and C as well as the antioxidant lycopene and the amino acid citrulline.
Because they are made up of 92% water, watermelons can be an effective way to stay hydrated during trick-or-treating, and creations like a Mummy or Jack O’Melon can help satisfy sweet cravings while keeping friends and family members frightfully delighted.
To get started, consider these carving tips and tricks:
- To make cutting and slicing easier, the watermelon should be at room temperate when carving.
- Cut a small, thin, flat piece from the bottom of the watermelon to provide a stable base for carving.
- Draw the design on the watermelon rind with a dry-erase marker before cutting. If you make a mistake, this can make it easier to wipe off.
- Use a sharp knife with a pointed tip for easier, cleaner cuts. Consider a paring knife with a smaller tip for ease of detail.
- Blend scraps of watermelon that are too messy for dicing or slicing to create an easy juice.
For more watermelon carving ideas, visit watermelon.org.

Mummy
Supplies and Tools:
- Watermelon
- Cutting board
- Kitchen knife
- Dry-erase marker
- Paring knife
- Melon baller
- Scoop
- Vegetable peeler
- Cheesecloth or gauze
- Straight pin (optional)
- Battery-operated candle or light
- Small bowl
- Blueberries or bloody candy eyes
- Toothpicks, pins or glue
- Wash watermelon under cool running water and pat dry.
- On cutting board, place watermelon on its side and use kitchen knife to cut off 1/4-1/2-inch of rind from bottom to provide sturdy base, being careful not to cut too deep into white part of rind. Cut 1-2 inches from stem end to create opening for bowl to be added.
- Using dry-erase marker, draw eyes, nose and mouth, along with wavy slits around carving. Use paring knife to cut them out, being sure to cut through to red flesh to let more light flow through.
- Use melon baller to hollow out inside of watermelon. Reserve watermelon balls. Use scoop to remove remaining watermelon.
- Using vegetable peeler, remove green skin off outside of watermelon, similar to peeling cucumber.
- Wrap thin strips cheesecloth or gauze around mummy carving and secure with straight pin, if needed.
- Place battery-operated candle or light inside carving and fit small bowl into top of carving. Trim away excess rind to make bowl fit securely.
- Fill bowl with melon balls. Attach candy eyes or blueberries using a toothpicks, pins or glue.
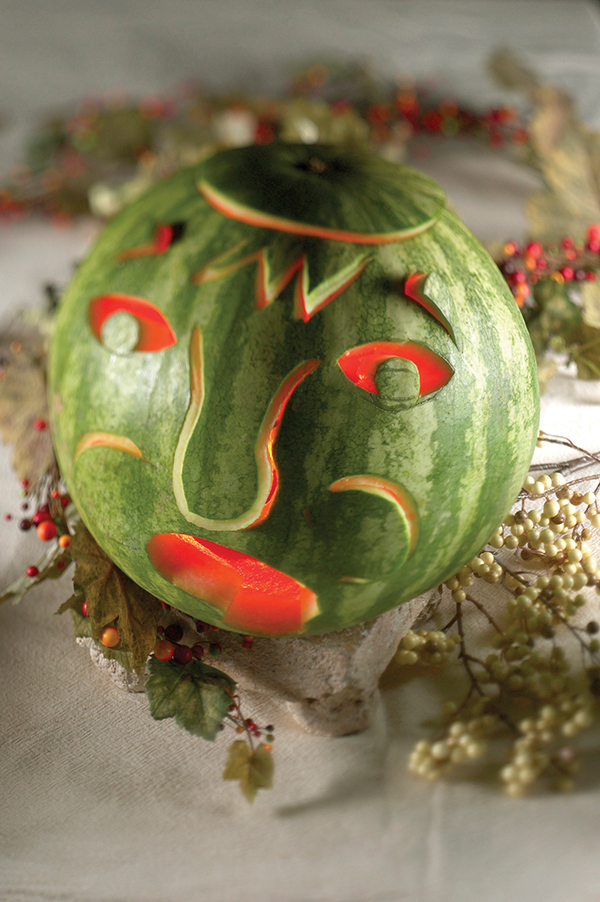
Jack O’Melon
Supplies and Tools:
- Knife
- Round watermelon
- Melon baller
- Dry-erase marker
- Toothpicks (optional)
- Battery-operated light
- Using knife, cut thin slice from bottom of watermelon to provide stable base.
- Cut circular piece of rind from top of watermelon big enough to reach into and remove flesh. Carefully remove top section and reserve for use as “lid.”
- Remove flesh from inside watermelon using melon baller, reserving melon balls for snacking. Hollow out remaining watermelon flesh and use blender to juice scraps and excess juice.
- Using dry-erase marker, draw outlines of eyes, nose, mouth, hair, ears and other features on side of watermelon. If mistake is made with marker, wipe off using paper towel to start over. Following outlines, carve features into watermelon and remove excess rind.
- Safe, battery-operated light can be firmly placed inside watermelon to provide haunting glow.
- Place circular piece of rind back on top of watermelon.

(Family Features) It’s easy to get into a recipe rut when every day feels the same – work, kids’ activities, social events and bedtime routines make it tough to experiment in the kitchen. If your family’s meals are growing boring, all you need is a touch of heat to bring new life to the menu.
Add a delicious blend of savory, sweet and a hint of spice to mealtime with Minute Hot Honey Chicken Seasoned Rice Cups, which are ready to serve fast for busy families. Packed with flavor, they complement main courses, snacks and sides without the hassle.
With just the right balance of heat and honey, they add delicious sizzle and mouthwatering flavor to recipes like Hot Honey Chicken Meatball Subs. Perfectly toasted hoagie rolls are packed with spicy, sweet chicken meatballs and smothered in melted provolone for a tough-to-top taste. Ready in 35 minutes, the subs offer a blend of convenience and gourmet flavor, making this meal an unbeatable choice at dinner time.
Sandwiches deliver an easy way to make mealtime customizable so all your loved ones are satisfied. Try topping your subs with coleslaw for a crunchy, creamy texture or pickled vegetables for an added touch of tanginess to complement the sweet, rich meatballs. For fans of spice, turn up the heat with extra hot sauce.
Solve afternoon hunger pangs with these Hot Honey Chicken Rice Crackers and Ranch Dip, loaded with the sweet heat of hot honey chicken and baked to crispy perfection. This inventive snack is uniquely crunchy and flavorful, blending fiery sweetness with savory chicken flavor as a convenient way to shake up snack time.
For the adventurous types, these homemade crackers pair with more than just ranch. Engage your taste buds further with these suggestions:
- Spicy cheese dip: Add a little extra kick with cheese dip that’s spiced up with jalapenos or chili flakes.
- Cucumber dill yogurt: A perfect match for the sweet heat of hot honey chicken with its refreshing, cooling effect.
- Barbecue sauce: Smoky and slightly sweet, it pairs well with the honey in the crackers.
- Garlic aioli: Rich and garlicky, this dip brings a robust flavor contrast to the table.
Discover more ways to shake up mealtimes by visiting MinuteRice.com.

Hot Honey Chicken Meatball Subs
Prep time: 5 minutes
Cook time: 30 minutes
Servings: 4
- 1 Minute Hot Honey Chicken Seasoned Rice Cup
- 1 pound ground chicken
- 1 teaspoon salt
- 1 teaspoon cayenne pepper (optional)
- 1/4 cup breadcrumbs
- 4 hoagie rolls
- 2 tablespoons butter
- 4 slices provolone cheese
- garlic sauce, for garnish
- Preheat oven to 375 F. Heat rice according to package directions.
- In large bowl, mix rice; chicken; salt; cayenne, if desired; and breadcrumbs.
- Use cookie scoop or hand roll chicken mixture into balls. Place on aluminum foil-lined sheet tray, leaving small space between each ball. Bake 25 minutes, flipping meatballs halfway through.
- Slice hoagies in half, lengthwise. Remove some bread from middle to make room for meatballs. Butter inside of each hoagie and place on sheet tray.
- Once meatballs are cooked through, turn broiler on high and place buttered hoagies in oven. Cook 1 minute, or until butter is melted and hoagie has browned.
- Remove hoagies from oven, place 3-4 meatballs inside (depending on size) and cover with slice of cheese. Broil on high 30 seconds to melt cheese.
- Drizzle garlic sauce on top.
Tip: Garlic sauce can be substituted with topping of choice.

Hot Honey Chicken Rice Crackers andRanch Dip
Prep time: 5 minutes
Cook time: 20 minutes
Servings: 2
- 1 Minute Hot Honey Chicken Seasoned Rice Cup
- 1 cup sour cream
- 1/2 packet ranch dip seasoning
- Preheat oven to 400 F. Heat rice according to package directions.
- Lay rice on parchment paper. Place another sheet of parchment paper on top. Use rolling pin to roll out rice into thin layer.
- Bake 20 minutes.
- In medium bowl, mix sour cream and ranch seasoning.
- Once crackers are cooked, cut into squares while still hot. Allow to cool.
- Serve crackers with ranch dip.
Tip: Ranch dip can be substituted with hummus or any flavored dip.
SOURCE:
Minute Rice

(Family Features) When the crisp air of spring tickles your face and sunrays splash you with warmth, you know salad season has arrived. With fresh flavors abounding this season, the options are nearly endless – just choose your favorite base, toppings and dressings and you’re set with a delicious first course or hearty meal all on its own.
Not every salad requires leafy greens for the base, however. Consider this Greek Beet and Watermelon Rice Salad, a Greek-inspired Jasmine rice dish loaded with fresh, tangy flavors that are sure to please your taste buds. Made with Success Boil-in-Bag Jasmine Rice that cooks up soft and fluffy every time, this recipe offers a hint of floral, sweet flavor to keep you feeling full. In just 10 minutes, you can have sweetly aromatic Jasmine rice that’s perfect for your lifestyle needs – it’s naturally gluten free, non-GMO Project Verified and free of MSG and preservatives.
Fruit salad may be nothing new, particularly when using fruits like oranges, cherries or grapes, but watermelon may be the fun new spin you need at your next cookout. The pairing of sweet watermelon, tangy feta cheese, refreshing mint, earthy beets, nuts and fluffy rice offers a winning combination. Quick tip: Make sure the rice is fully cooled after cooking to avoid a warm, watery result.
Fresh herbs, tomatoes, corn, basmati rice and a simple vinaigrette make Spring Corn and Rice Salad another delicious seasonal side that’s ready in just 15 minutes. Step out of your salad comfort zone with this refreshing solution that makes it easy to add veggies to your diet. When you’re drawing up weekly meal plans and tired of relying on traditional lettuce-based salads, consider rice salads as an alternative for enjoying chopped vegetables – plus, hearty rice can help keep you full longer.
Better yet, you can make this rice salad your own by experimenting with the ingredients. Try adding shredded chicken, hard-boiled eggs, fresh mango, ground cumin, fresh grated ginger, grilled corn or any other springtime flavors.
Remember, high quality doesn’t have to be high maintenance. Aromatic, premium long-grain Success Boil-in-Bag Basmati Rice is a no measure, no mess option that cooks up perfectly every time. Aside from being naturally gluten free, it’s also free of preservatives and MSG and is non-GMO Project Verified. It’s no stranger to versatility either – in 10 minutes, you can enjoy basmati rice’s subtle, nutty flavor and unique texture alongside other warm-weather favorites.
Find more ways to enjoy spring salad season by visiting SuccessRice.com.

Greek Beet and Watermelon Rice Salad
Prep time: 15 minutes
Cook time: 10 minutes
Servings: 4
- 1 bag Success Jasmine Rice
- 1/4 cup olive oil
- 2 tablespoons lemon juice
- 1/4 teaspoon salt
- 1/4 teaspoon black pepper
- 1 cup thinly sliced, cooked golden beets
- 1 cup thinly sliced watermelon
- 1/4 cup feta cheese, crumbled
- 1/4 cup pitted black olives, halved
- 1/4 cup red onion, thinly sliced
- 1 tablespoon fresh mint, thinly sliced
- 2 tablespoons walnuts, toasted and chopped, for garnish
- Prepare rice according to package directions. Allow to cool completely.
- In medium bowl, whisk oil, lemon juice, salt and pepper.
- Add rice to bowl with dressing and stir to combine. Let stand 5 minutes.
- Transfer rice to serving platter. Lay beet slices down one side of rice. Lay watermelon slices down opposite side. Top with feta, olives, red onion and mint. Garnish with walnuts.
Tips: Substitute capers for olives, if preferred.
To diminish “raw” flavor of onions, soak in ice water at least 5 minutes before using in recipe.
Use roasted, boiled, steamed or grilled beets.

Spring Corn and Rice Salad
Prep time: 5 minutes
Cook time: 10 minutes
Servings: 4
- 1 bag Success Basmati Rice
- 1 cup frozen corn, thawed
- 2 Roma tomatoes, seeded and diced
- 1/2 cup minced fresh basil
- 1/2 cup diced red onion
- 1/2 cup vinaigrette dressing
- 2 green onions, chopped
- 1/2 teaspoon salt
- 1/2 teaspoon black pepper
- Prepare rice according to package directions. Allow to cool completely.
- In medium bowl, combine corn, tomatoes, basil, red onions, vinaigrette and green onions. Fold in rice, salt and pepper.
- Serve salad at room temperature or chilled.
SOURCE:
Success Rice
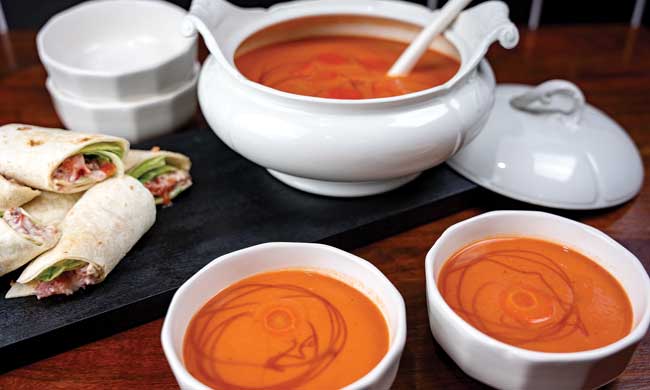
(Family Features) If you’re in need of a soup outside the usual mushroom or celery varieties, turn to another springtime favorite: carrots. More than just a veggie you can serve with dip, they’re creamy, delicious and pair well with ginger in this Creamy Carrot Soup. Discover more easy recipes for family meals at Culinary.net.

Creamy Carrot Soup
Recipe courtesy of “Cookin’ Savvy”
Servings: 4-6
- 2 cans (14 ounces each) carrots
- 2 cups broth of choice
- 1/2 cup brown sugar
- 1 tablespoon garlic powder
- 1 tablespoon onion powder
- 2 teaspoons ginger
- 1/4 cup orange juice
- 1/4 cup heavy cream
- salt, to taste
- pepper, to taste
- honey
- BLT wraps, for serving
- In blender, blend canned carrots, including juices, until smooth. Transfer to pot and add broth.
- Mix in brown sugar, garlic powder, onion powder, ginger and orange juice. Bring to simmer then add cream. Add salt and pepper, to taste.
- Drizzle honey over each bowl. Serve with BLT wraps.
SOURCE:


-
 NEWS2 years ago
2 hurt, 1 jailed after shooting incident north of Nocona
-

 NEWS2 years ago
Suspect indicted, jailed in Tia Hutson murder
-
 NEWS2 years ago
SO investigating possible murder/suicide
-

 NEWS2 years ago
Wreck takes the life of BHS teen, 16
-

 NEWS2 years ago
Murder unsolved – 1 year later Tia Hutson’s family angry, frustrated with no arrest
-
NEWS2 years ago
Sheriff’s office called out to infant’s death
-
 NEWS2 years ago
Bowie Police face three-hour standoff after possible domestic fight
-
NEWS2 years ago
Driver stopped by a man running into the street, robbed at knifepoint