
Live Better
How to stay organized with the living well planner

Since I was about 8 years old, I’ve been slightly (ok, majorly) obsessed with planners. The first planner I had was a Lisa Frank tri-fold organizer that had a little diary, an address book, a calculator and a notepad. The colors were so bright that my eyeballs almost bled and the calculator was so tiny that even my 8-year-old fingers were too big for it, but I loved that thing and guarded it with my life.
When I was about 13, I “upgraded” from a Lisa Frank organizer to a “Morning Glory” planner. If you’re not familiar with Morning Glory, it’s a Korean stationery brand that is famous for “Blue Bear.” There were tons of varieties of paper you could add to the planner and a handy plastic zipper pocket that I kept my millions of puffy stickers in.
After I outgrew the Morning Glory planner, I switched to a Lily Pulitzer agenda. Every year my husband would get me one for Christmas, and up until recently, it’s served me well. If I don’t write my appointments down, there’s no way I’m going to remember them. I’ve tried using my iPhone calendar, but it just doesn’t work for me. The Lily Pulitzer agenda was perfect for keeping me on track for years.
I NEED A LIFE PLANNER, NOT JUST AN AGENDA
Recently, though, I’ve wanted something more than the Lily Pulitzer agenda offers. While it’s great for jotting down appointments, notes, etc., I wanted more of an entire life planner. Something where I could keep track of not only my appointments, but my goals, budget, weekly and monthly plans, expenses, etc. I find it super helpful to see everything all laid out in front of me.
I’m a big fan of Ruth Soukup from Living Well, Spending Less. So when I discovered that she had designed a life planner, I was pretty certain that it’d be awesome.
It just so happened that my husband was trying to think of something to get me for our wedding anniversary, so I casually mentioned the Living Well Planner. Lo and behold, guess what I got on our anniversary? Thanks, husband! ?
At $55, it’s not exactly cheap (but it’s well within the range of normal for a life planner of this quality.) And honestly, I think it’s well worth the price.
Each month also features a motivating quote, which I love. (Below is January’s quote.)

One of my favorite features is the “Goal Crushing” and “Project Planning” section.
The project planning section can be used for any project you like, from planning a birthday party to running a marathon to publishing an eBook – whatever you want.
I also love how the Goal Crushing section is laid out.
Perhaps one of my favorite features (and definitely one of the most important!) is the monthly budgeting section. There are spaces for almost everything that you can think of. There are also suggestions of how much you should be spending on different expenses (of course, they’re just suggestions. Everyone’s situation is different, but it’s a good starting point.)

LIVING WELL PLANNER ACCESSORIES
To be honest, you don’t really “need” any accessories for the Living Well planner, but I’m kind of a sucker for cute stickers, so I ordered a few sheets. I love to personalize my planner with stickers but the OCD in me likes things to match, so the Living Well stickers were the perfect choi
FINAL THOUGHTS
There are so many planners on the market that it can become easy to feel overwhelmed. I was like that – I spent hours looking at different websites, trying to figure out which one I should buy. Honestly, I just decided to bite the bullet and go with the Living Well planner, and I love it.
I’m excited to fill it up in 2017!
Do you want to get your life organized in 2017 with the Living Well Planner? Here’s the link to get your own!

(Feature Impact) From immersive dining to wellness at sea and elevated entertainment, cruise vacations are becoming some of the most experience-rich trips travelers can take.
“Our industry has long been known for innovation, but what’s most compelling now is how that scale is being leveraged to invest in more immersive entertainment, wellness experiences and purpose-driven exploration at destinations around the world,” said Chiara Giorgi, global event and brand director for Seatrade Cruise Global, the largest and longest-running annual event of its kind serving every sector of the international cruise industry, including cruise lines, suppliers, travel agents and partners.
//www.youtube.com/embed/3tlYK2jcy94
To take advantage of the evolution of the industry when planning your next vacation at sea, consider these emerging trends identified at the conference.
The Rise of Floating Wellness Retreats
Once upon a time, wellness meant spas, saunas and massages. Wellness in 2026 is much more luxurious and is deeply embedded into the cruise experience. For example, Cunard’s “Wellness at Sea” voyages integrate expert-led fitness, nutrition, mindfulness and recovery programming, turning wellness into a structured, goal-driven experience and elevating wellness as a core pillar of the onboard experience. Additional cruise lines, including Virgin Voyages and Celebrity Cruises, are also helping raise the bar on floating wellness. Think thermal suites, meditation spaces and sleep-focused programming, along with wellness excursions and destination-inspired spa rituals that extend the experience to the shore.
Dining Becomes the Experience
 Dining has long been a key component of many cruises, but now, food and drink are evolving from a cruise staple to a central form of entertainment and cultural discovery. Cruise lines are investing in immersive dining environments, destination-inspired menus and beverage programs that connect guests more directly with the places they visit.
From location-specific cuisine to interactive dining concepts and destination-driven cocktail programs, F&B@Sea, Seatrade Cruise Global’s companion show, found culinary experiences are increasingly designed to be memorable punctuation points of the journey itself. Across the industry, cruise lines are investing heavily in culinary programs that blur the line between dining and entertainment. Tapping into the supper club trend, Royal Caribbean introduced the Empire Supper Club to turn dinner into a night out at sea, combining multi-course menus, craft cocktails and live music for a full evening experience.
Exploring Expeditions with Purpose
Expedition travel is having more than a moment. It continues to grow as travelers seek deeper engagement with the natural world. Leading the shift toward purpose-driven explorations, operators such as National Geographic-Lindblad Expeditions, long recognized for pioneering modern expedition travel, helped define this category through a model rooted in education, conservation and hands-on exploration. Built on the belief that exploring the world can inspire people to care more deeply for it, expert-led expeditions, such as kayaking among glaciers, participating in citizen science programs studying seabirds and learning directly from naturalists and scientists, place a strong emphasis on stewardship and real-world learning.
Ships as Cultural Hubs
Entertainment at sea is expanding beyond traditional stage shows to include immersive productions, music residencies and partnerships with leading performing arts brands. For example, Holland America Line joined forces with The Verdon Fosse Legacy to debut “Fosse and Verdon, The Duet That Changed Broadway,” a live musical and multimedia tribute celebrating the revolutionary work of Bob Fosse and Gwen Verdon by bringing it to an international stage at sea for the first time.
As cruises continue to expand their global footprint, the Seatrade Cruise Global event positions itself not simply as a trade gathering, but as the central forum where trends are explored and defined. To learn more, visit seatradecruiseevents.com.
Photos courtesy of Shutterstock
SOURCE:

(Feature Impact) You’re not imagining it – like many goods and services, pet care costs have gone up.
In fact, Healthy Paws Pet Insurance reported a 38% increase in pet services over the past five years with pet parents spending more than $4,200 a year on routine expenses for a cat or dog.
Lots of factors are driving increased costs, from higher ingredient prices for pet food – like meat and grains – to veterinary drug shortages. Add in rising labor and transportation costs and those everyday expenses can start to take a bigger bite out of your budget.
There are simple ways to keep costs in check, however, while still giving your furry friends the care they deserve:
1. Prioritize Preventive Care
Routine checkups, vaccinations and screenings can catch health issues early when they are easier and less expensive to treat. Most pets should see a veterinarian at least once a year, while puppies, kittens and senior pets may need more frequent visits.
Preventive medications play an important role as well. Treating heartworm disease, for example, can cost thousands while monthly prevention costs $15-$30.
2. Focus on Daily Wellness
Consistent exercise helps reduce the risk of chronic conditions and supports overall health. Most dogs benefit from at least 30 minutes of daily activity while cats need regular play to stay active.
Feeding appropriate portions can also help with weight maintenance. Portion sizes vary, but a good starting point is the feeding guidelines on your pet food label, adjusting as needed with your veterinarian’s input.

3. Find Support in Your Community
Many local humane societies and rescue groups offer resources that make pet care more accessible, including low-cost vaccinations, spay and neuter services and discounted supplies.
For seniors, local Meals on Wheels providers can be important resources. With support from PetSmart Charities, many local providers offer free pet food and, in some cases, services like veterinary care and grooming. To date, 20 million pet meals have been delivered through this collaboration, helping keep pets healthy and in loving homes with older adults.
4. Plan Ahead for Unexpected Costs
Even with routine care, unexpected illnesses or injuries can happen – and costs can add up. The PetSmart Charities-Gallup State of Pet Care research revealed 52% of pet parents skipped or declined veterinary care services in 2025, with the majority citing cost as the key barrier.
Pet insurance can help manage risk. Most policies reimburse a percentage of covered veterinary costs after you meet a deductible, helping offset unexpected bills. Plans vary, but average monthly premiums are around $60 for dogs and $30 for cats.
It’s also important to be open with your veterinarian about financial concerns. In many cases, clinics may be able to offer payment plans, or look for low-cost-veterinary care resources in your area.
To find a local provider and learn whether pet support is available in your area, visit mealsonwheelsamerica.org/lovepets.
A Companion Through It All
A devastating cancer diagnosis left Lois hospitalized for eight months. Afterward, she began receiving home-delivered meals through her local Meals on Wheels provider. That connection proved to be a lifeline.
“When I was sick,” Lois said, “the Meals on Wheels volunteers … were the only company I had.”
That changed when a small white kitten with calico markings showed up at her front door. Today, that kitten – now named Grace – is rarely far from Lois’s side.
Though Grace softens Lois’s loneliness, caring for a pet on a fixed income isn’t always easy. For many seniors, it can mean making difficult choices, like stretching groceries or delaying medical care, just to afford pet food and supplies. Through support from her local provider, food is delivered for Grace as part of Lois’s regular meal service, helping keep them both healthy, happy and, most importantly, together.
SOURCE:
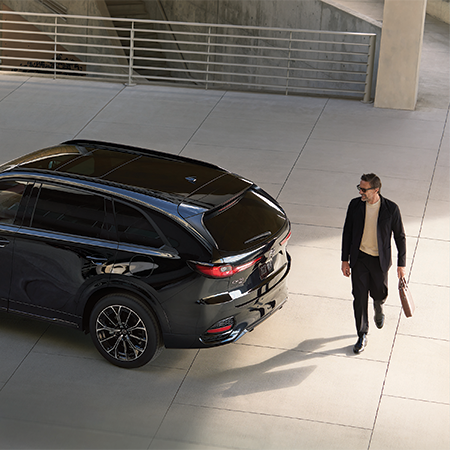
(Family Features) In a world where everyone is juggling busy schedules and endless choices, it’s only natural to want more from your vehicle. Not just more features, but more comfort, more quality and more enjoyment every time you get behind the wheel.
According to recent survey data from Mazda, 74% of car buyers said special features are “very” or “extremely important,” but 30% admitted they don’t have any features worth showing off to friends or family. This is the “luxury letdown;” the excitement of new features fades, leaving you wanting something more meaningful from your car.
People are looking for more than just bells and whistles. They want a car that feels good to drive, that is thoughtfully designed and that brings more joy and satisfaction to everyday life. It’s not about having the most options or the flashiest tech. It’s about all that and quality, comfort and a sense of connection that lasts long after the new car smell fades.
Beyond the Surface
Forget what you think you know about luxury vehicle features. The most memorable cars are typically built with an incredible attention to detail – a craftsmanship you can see and feel. Smart, thoughtful innovation makes driving better, not more complicated. From the shape of the seats to the way the materials feel under your fingertips, every detail is designed to enhance the experience. In fact, 80% of survey respondents said thoughtful design that makes the driving experience better is extremely or very important during the car-buying process. These subtle touches elevate the everyday and make a car feel truly special.
 The Joy of Driving, Reimagined
Driving should be more than a means to get from point A to point B. The most rewarding vehicles are often those that make every journey feel intentional and enjoyable. Responsive handling, intuitive controls and a cabin designed for comfort can transform even the most routine commute into a moment of enjoyment. When a car is engineered to connect driver and road, it brings back the pleasure of driving many have forgotten. For some, this feeling gets lost beneath features and digital overload, but it’s possible to rediscover harmony between driver and car – making every trip feel intentional and rewarding.
Confidence Comes Standard
Safety is more than a feature – it’s a foundation. Advanced safety technologies and strong crash-test ratings provide peace of mind for drivers and their families. With an industry-leading number of Insurance Institute for Highway Safety Top Safety Pick+-awarded vehicles – including the Mazda3 Sedan and Hatchback, CX-30, CX-50, CX-50 Hybrid, CX-70, CX-70 PHEV, CX-90 and CX-90 PHEV – Mazda is committed to keeping safety at the forefront. Features like active safety systems, robust body structures and intelligent alerts help keep everyone protected, allowing drivers to focus on the road ahead.
Value That Surprises
Many shoppers believe a premium experience comes with a premium price tag. However, value is found in vehicles that deliver quality, innovation and comfort without the luxury markup. The materials, craftsmanship and driving dynamics often surprise those who expect to pay more for such an experience. It’s not just about what’s included, but how it all comes together to create a sense of satisfaction and pride in ownership. The result is a driving experience that feels special, accessible and built to last.
A New Standard for Everyday Driving
In a world that constantly demands so much, there is a kind of more that stands out. Not just in features, but in the feeling, the craftsmanship and the sheer joy of driving. This is the more of Mazda – a more that is intentional, meaningful and designed to enrich every journey.
When you’re ready for more from your next vehicle, visit Mazdausa.com.
SOURCE:
Mazda


-

 NEWS3 years ago
Suspect indicted, jailed in Tia Hutson murder
-
 NEWS4 years ago
2 hurt, 1 jailed after shooting incident north of Nocona
-
 NEWS3 years ago
SO investigating possible murder/suicide
-

 NEWS4 years ago
Wreck takes the life of BHS teen, 16
-
 NEWS3 years ago
Murder unsolved – 1 year later Tia Hutson’s family angry, frustrated with no arrest
-
 Show us something good9 years ago
Country music star children perform in Bowie
-
NEWS3 years ago
Sheriff’s office called out to infant’s death
-
 100th Birthday4 years ago
Looking back at the 1958 Centennial edition of The Bowie News