
Live Better
Make EasterEggstra Special
6 tips to bring your family together to decorate eggs
(Family Features) Easter is about traditions, both old and new, as well as celebrating family and creating lifelong memories. In fact, nearly 8 out of 10 Americans will celebrate the holiday this year, according to the National Retail Federation, which often includes egg decorating amongst the fun.
Decorating eggs for Easter is a tradition that dates back to the 13th century. Eggs were once viewed as a forbidden food to some religious entities, so people would paint or decorate them to highlight the end of penance and fasting.
Yet still today, coloring eggs can help bring the whole family together and inspire simple moments of connection and creativity. From dunking eggs in neon dyes to embellishing them with paint, glitter and more, PAAS® brand – named after the Dutch word for Easter, “Passen” – offers these expert Easter egg dyeing tips based on its 140 years of experience.
Keep It Clean – Wash your hands in hot, soapy water before and after handling eggs, even if they’ve already been cooked or decorated. This helps protect you from any bacteria that may be on the egg and protects the eggshell from oil on hands that may make the dye not adhere properly. Make sure an adult supervises all projects to ensure food safety precautions are observed.
Hard Cook, Don’t Hard Boil – Although the cooking water must come to a full boil, the pan should be immediately removed from heat so the eggs can cook gently in the hot water. This method produces tender, not rubbery eggs and minimizes cracking.
Banish the Greenish Ring – This harmless but unsightly discoloration sometimes forms around hard-cooked yolks as a result of a reaction between sulfur in the egg white and iron in the yolk. It occurs when eggs have been cooked for too long or at too high a temperature. Cooking eggs in hot, not boiling water then cooling immediately helps minimize this discoloration.
Make Them “Apeeling” – To ensure easily peeled eggs, buy and refrigerate them 7-10 days in advance of cooking. This brief “breather” allows the eggs time to take in air, which helps separate the membranes from the shell.
Store Eggs Safely – In the shell, hard-cooked eggs can be refrigerated safely for up to one week. Refrigerating them in their original carton prevents odor absorption. Once peeled, eggs should be eaten that day. Piercing shells before cooking is not recommended. If not sterile, the piercer or needle can introduce bacteria into the egg. Also, piercing creates hairline cracks in the shell through which bacteria can enter after cooking.
Tap Into Your Creative Side – You don’t have to be highly creative to create an “eggceptional” egg. Use your imagination to create appealing eggs by gluing on fun materials found at craft stores, like fake gems, sequins, trims and ribbons. You can also use paint, including gold or silver metallic paint, to make eggs special. An option like PAAS egg decorating kits can help make the process more convenient and fun.
Find more tips and ideas to bring your family together this Easter at paaseastereggs.com.
How to Hard Cook Eggs
Hard-cooked eggs are best when you want a sturdy egg for hiding and to eat when you’re done. They are also easier for younger children to handle. Eggs can be hard-boiled or baked to achieve tender eggs perfect for dyeing. Consider these tips from the Easter egg decorating experts at PAAS to cook eggs for decorating:
Hard Boil Directions
- Place eggs in saucepan large enough to hold them in single layer.
- Add cold water to cover eggs by 1 inch.
- Heat pan over high heat until just boiling.
- Remove pan from burner.
- Cover pan.
- Let eggs stand in hot water about 15 minutes for large eggs. Time may need adjusted for smaller or larger eggs.
- Cool completely under cold running water or in bowl of ice water.
- Refrigerate until ready to use.
Baking Directions
- Preheat oven to 325 F.
- Place eggs individually in muffin tins to prevent them from rolling while cooking.
- Cook 30 minutes.
- Fill large bowl with ice water. Set aside.
- Remove eggs from oven.
- Transfer eggs carefully, one-by-one into ice water using tongs.
- Remove from water after 10 minutes.
- Refrigerate until ready to use.
Egg Decorating Kits to Make Egg Dyeing Easy
There’s more than one way to dye an egg. To meet various needs and interests, PAAS offers a variety of kits, including:
- Traditional Kits – Deluxe, Classic and Color Cup kits allow families to create a full spectrum of colored eggs.
- Craft Kits – Craft kits help users create their own one-of-a-kind works of art, such as color whipping eggs, adding sparkles or speckles, or creating neon tie-dyed eggs.
- Eggsperiment – Active Volcano – This kit allows users to dye eggs by lowering them into an overflowing volcano.
- Craft-A-Scene – These kits, which come in multiple versions, offer not only dyes and decorations to create character eggs, but also different backdrops that can be used in stop motion movies using a free app.
- Themed Eggs – These include Dino Eggs, Forest Friends, Rides and Superheroes kits that allow families to bring characters to life.
SOURCE:
PAAS

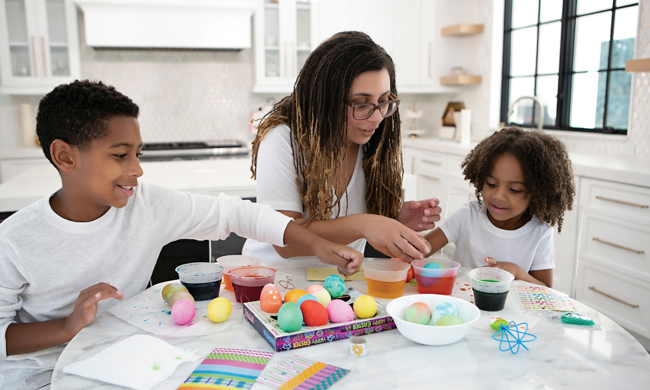
(Tiffany Miller) The summer of childhood had a different quality to it. The days felt unscheduled, the weeks unhurried, and the season itself stretched on in a way the calendar did not quite explain. A new survey from ThriftBooks, the largest independent online bookseller of new and used books, found that many readers believe the endless summer feeling is gone, and that the one thing most associated with getting it back is also the thing they feel least entitled to do.
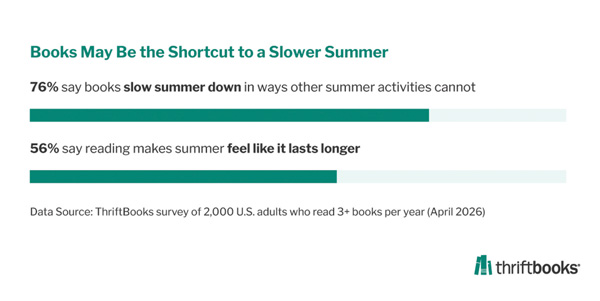
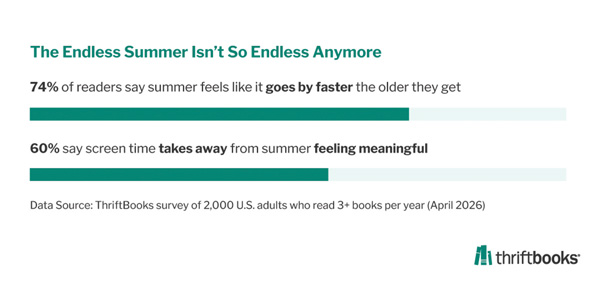
It also found that nearly three-quarters of U.S. adults who read say summer moves faster now than it did when they were growing up. And 76% say reading is the one thing that slows it down.
Summer used to feel different
Part of what shifted it was the screen. About 60% of readers say screens take away from the feeling of summer. The associations most tied to childhood summers — being outdoors, family time and reading — have quietly faded into the background. What replaced them is a season that feels more scheduled, more managed and harder to slow down.
Reading slows it down. Guilt gets in the way.
Reading holds a complicated place in that picture. Fifty-three percent of readers fell in love with reading during childhood, and the emotional connection between books and summer runs deep. Fifty-six percent say reading makes summer feel like it lasts longer, and most agree it helps them slow down in a way other forms of downtime simply do not.
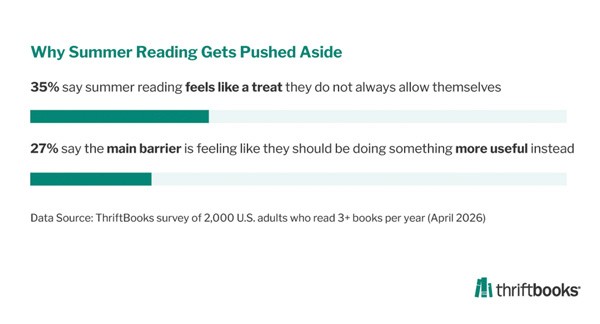
But wanting to read and feeling permitted to read are different things. Seventy-four percent of readers say they sometimes or often feel that reading for pleasure is only allowed after everything else is done. That hesitation often looks familiar: a book left on the nightstand while the dishes get done, a chapter saved for when the to-do list clears. The single biggest obstacle is not a shortage of time but the sense that reading is not productive enough to justify: 27% say the main barrier is feeling like they should be doing something more useful instead.
A generational divide
That tension runs deepest among younger readers. Gen Z enters summer more optimistic about reading than older generations, but also more burdened by it. Seventy-seven percent of Gen Z say reading makes summer feel longer, compared with 44% of Baby Boomers. Yet it is younger readers who are most likely to feel they need to earn the time first.
Why it matters now
The findings suggest summer often feels shorter because schedules and distractions leave less room to slow down. For many readers, books may be one of the simplest ways to bring back the endless summer feeling.
Methodology
ThriftBooks commissioned Atomik Research to conduct an online survey of 2,000 adults throughout the United States who read three or more books per year. The margin of error is plus or minus 2 percentage points with a confidence level of 95%.
Fieldwork took place between April 13 and April 17, 2026. Atomik Research, part of 4media group, is a creative market research agency.
Photo courtesy of Shutterstock
SOURCE:

(Feature Impact) As the days lengthen and warm air has you ready to get your patio furniture out of storage, that means it’s time to give your yard a fresh start. With a little planning now, you’ll be rewarded with a fuller, greener and easier-to-maintain outdoor space once spring is in full bloom.
1. Start With a Clean Slate
Winter leaves behind plenty of debris, including fallen branches and matted leaves. Before you start planting, take a walk around your yard and tidy up:
- Rake moisture-trapping twigs and leaves that can cause fungus
- Remove dead plants or spent annuals from flower beds
- Sweep or power wash patios and walkways
2. Tune Up Tools
Digging into yard work only to find rusty shears or a squeaky mower can prolong the task. Instead, ensure your tools are in good working order:
- Sharpen blades on lawn mowers, shears and pruners
- Install fresh string on trimmers and weed eaters
- Replace old fuel or clean air filters on gas-powered tools
3. Assess Your Lawn
Early spring is ideal for noticing how winter treated your grass. Dethatching and aeration can go a long way toward helping grass absorb nutrients. Set the stage for lush growth once warmer weather arrives by looking for:
- Bare patches that need reseeding
- Weeds making an early debut
- Compacted soil where water pools instead of soaking in
4. Give Plants the Right Start
Now’s the time to prep beds for new life. Before you plant:
- Loosen soil and mix in compost for nutrients
- Add mulch around perennials
- Plan your planting based on sun and shade patterns
5. Hydrate Wisely
Strong roots start with proper hydration. Even before sprigs pop up, early spring can be dry as the sun gets higher. Remember to:
- Water flowerbeds if rainfall has been scarce
- Check irrigation systems for damage
- Mulch lightly after soil warms to lock in moisture
Getting your yard ready early in spring isn’t about perfection; it’s about setting yourself up for outdoor enjoyment all season long. Find more tips to get your yard in shape at eLivingtoday.com.
Photo courtesy of Shutterstock
SOURCE:

(Feature Impact) After months of winter, spring cleaning isn’t just about dusting and vacuuming – it’s about inviting sunlight and fresh air into your space through the open windows and giving yourself a fresh start for the longer days ahead.
It’s also a perfect opportunity to clear out the old and make room for new experiences, memories and energy. Whether you’re tackling deep cleaning for the first time or you have seasonal rituals for tidying up your home, this room-by-room guide can help you plan and conquer seasonal chores.
Whole Home:
- Declutter spaces: Donate, recycle or discard what you don’t need
- Wash windows inside and out
- Dust baseboards, walls, vents and ceiling fans
- Wipe down doors, knobs and light switches
- Vacuum and clean under and behind furniture
- Clean curtains and blinds
- Store seasonal items like winter clothing and decor
- Replace air filters
- Shampoo carpet
Kitchen:
- Empty and wipe down refrigerator and freezer
- Clean oven, stovetop and microwave
- Scrub countertops and backsplashes
- Clean out the garbage disposal
- Sweep and mop floors
- Organize the pantry and throw away any expired items
Bathrooms:
- Scrub grout and tile
- Clean mirrors and glass surfaces
- Deep clean toilets
- Wipe down cabinets and bathroom fixtures
- Wash rugs, floor mats and the shower curtain and liner
- Empty trash and clean the bin
Bedrooms and Other Living Areas:
- Wash bedding, pillows and linens
- Organize closets and drawers
- Vacuum chair, couches and mattresses as well as under cushions
- Dust shelves and decor
- Clean light fixtures and lampshades
Outdoor Areas:
- Power wash patios, sidewalks and driveways
- Wipe down outdoor furniture and replace textiles like pillows, cushions and umbrellas
- Clear debris from garden beds
- Prune shrubs, plants and trees
- Organize garages and sheds
- Reconnect hoses and sprinklers
- Prep lawn equipment such as mowers, weed eaters and blowers
For more spring cleaning tips and tricks, visit eLivingtoday.com.
Photo courtesy of Shutterstock
SOURCE:


-

 NEWS3 years ago
Suspect indicted, jailed in Tia Hutson murder
-
 NEWS4 years ago
2 hurt, 1 jailed after shooting incident north of Nocona
-
 NEWS3 years ago
SO investigating possible murder/suicide
-

 NEWS3 years ago
Wreck takes the life of BHS teen, 16
-

 NEWS3 years ago
Murder unsolved – 1 year later Tia Hutson’s family angry, frustrated with no arrest
-
 Show us something good9 years ago
Country music star children perform in Bowie
-
NEWS3 years ago
Sheriff’s office called out to infant’s death
-
 100th Birthday4 years ago
Looking back at the 1958 Centennial edition of The Bowie News